How To Seal Entry Points For Mice: DIY Permanent Fixes
A single mouse can squeeze through a gap the size of a dime. That's roughly a quarter-inch opening, and most homes have dozens of them. If you've spotted droppings, heard scratching in the walls, or caught one darting across your kitchen floor, learning how to seal entry points for mice is the single most effective step you can take. Traps and bait deal with mice already inside. Sealing keeps new ones from replacing them.
At Defender Termite & Pest Management, we've handled rodent problems across the Greater Sacramento area since 1999. Over those years, we've seen the same vulnerable spots come up again and again, pipe penetrations, garage door gaps, foundation cracks , and utility line entries. We've also seen what works long-term and what doesn't. Spoiler: expanding foam alone won't cut it.
This guide walks you through the materials, tools, and step-by-step process to permanently block mice entry points around your home. We'll cover how to find the gaps you're probably missing, which sealing materials actually hold up against gnawing, and when a problem might call for professional rodent control . Let's get your house locked down.
What you need before you start
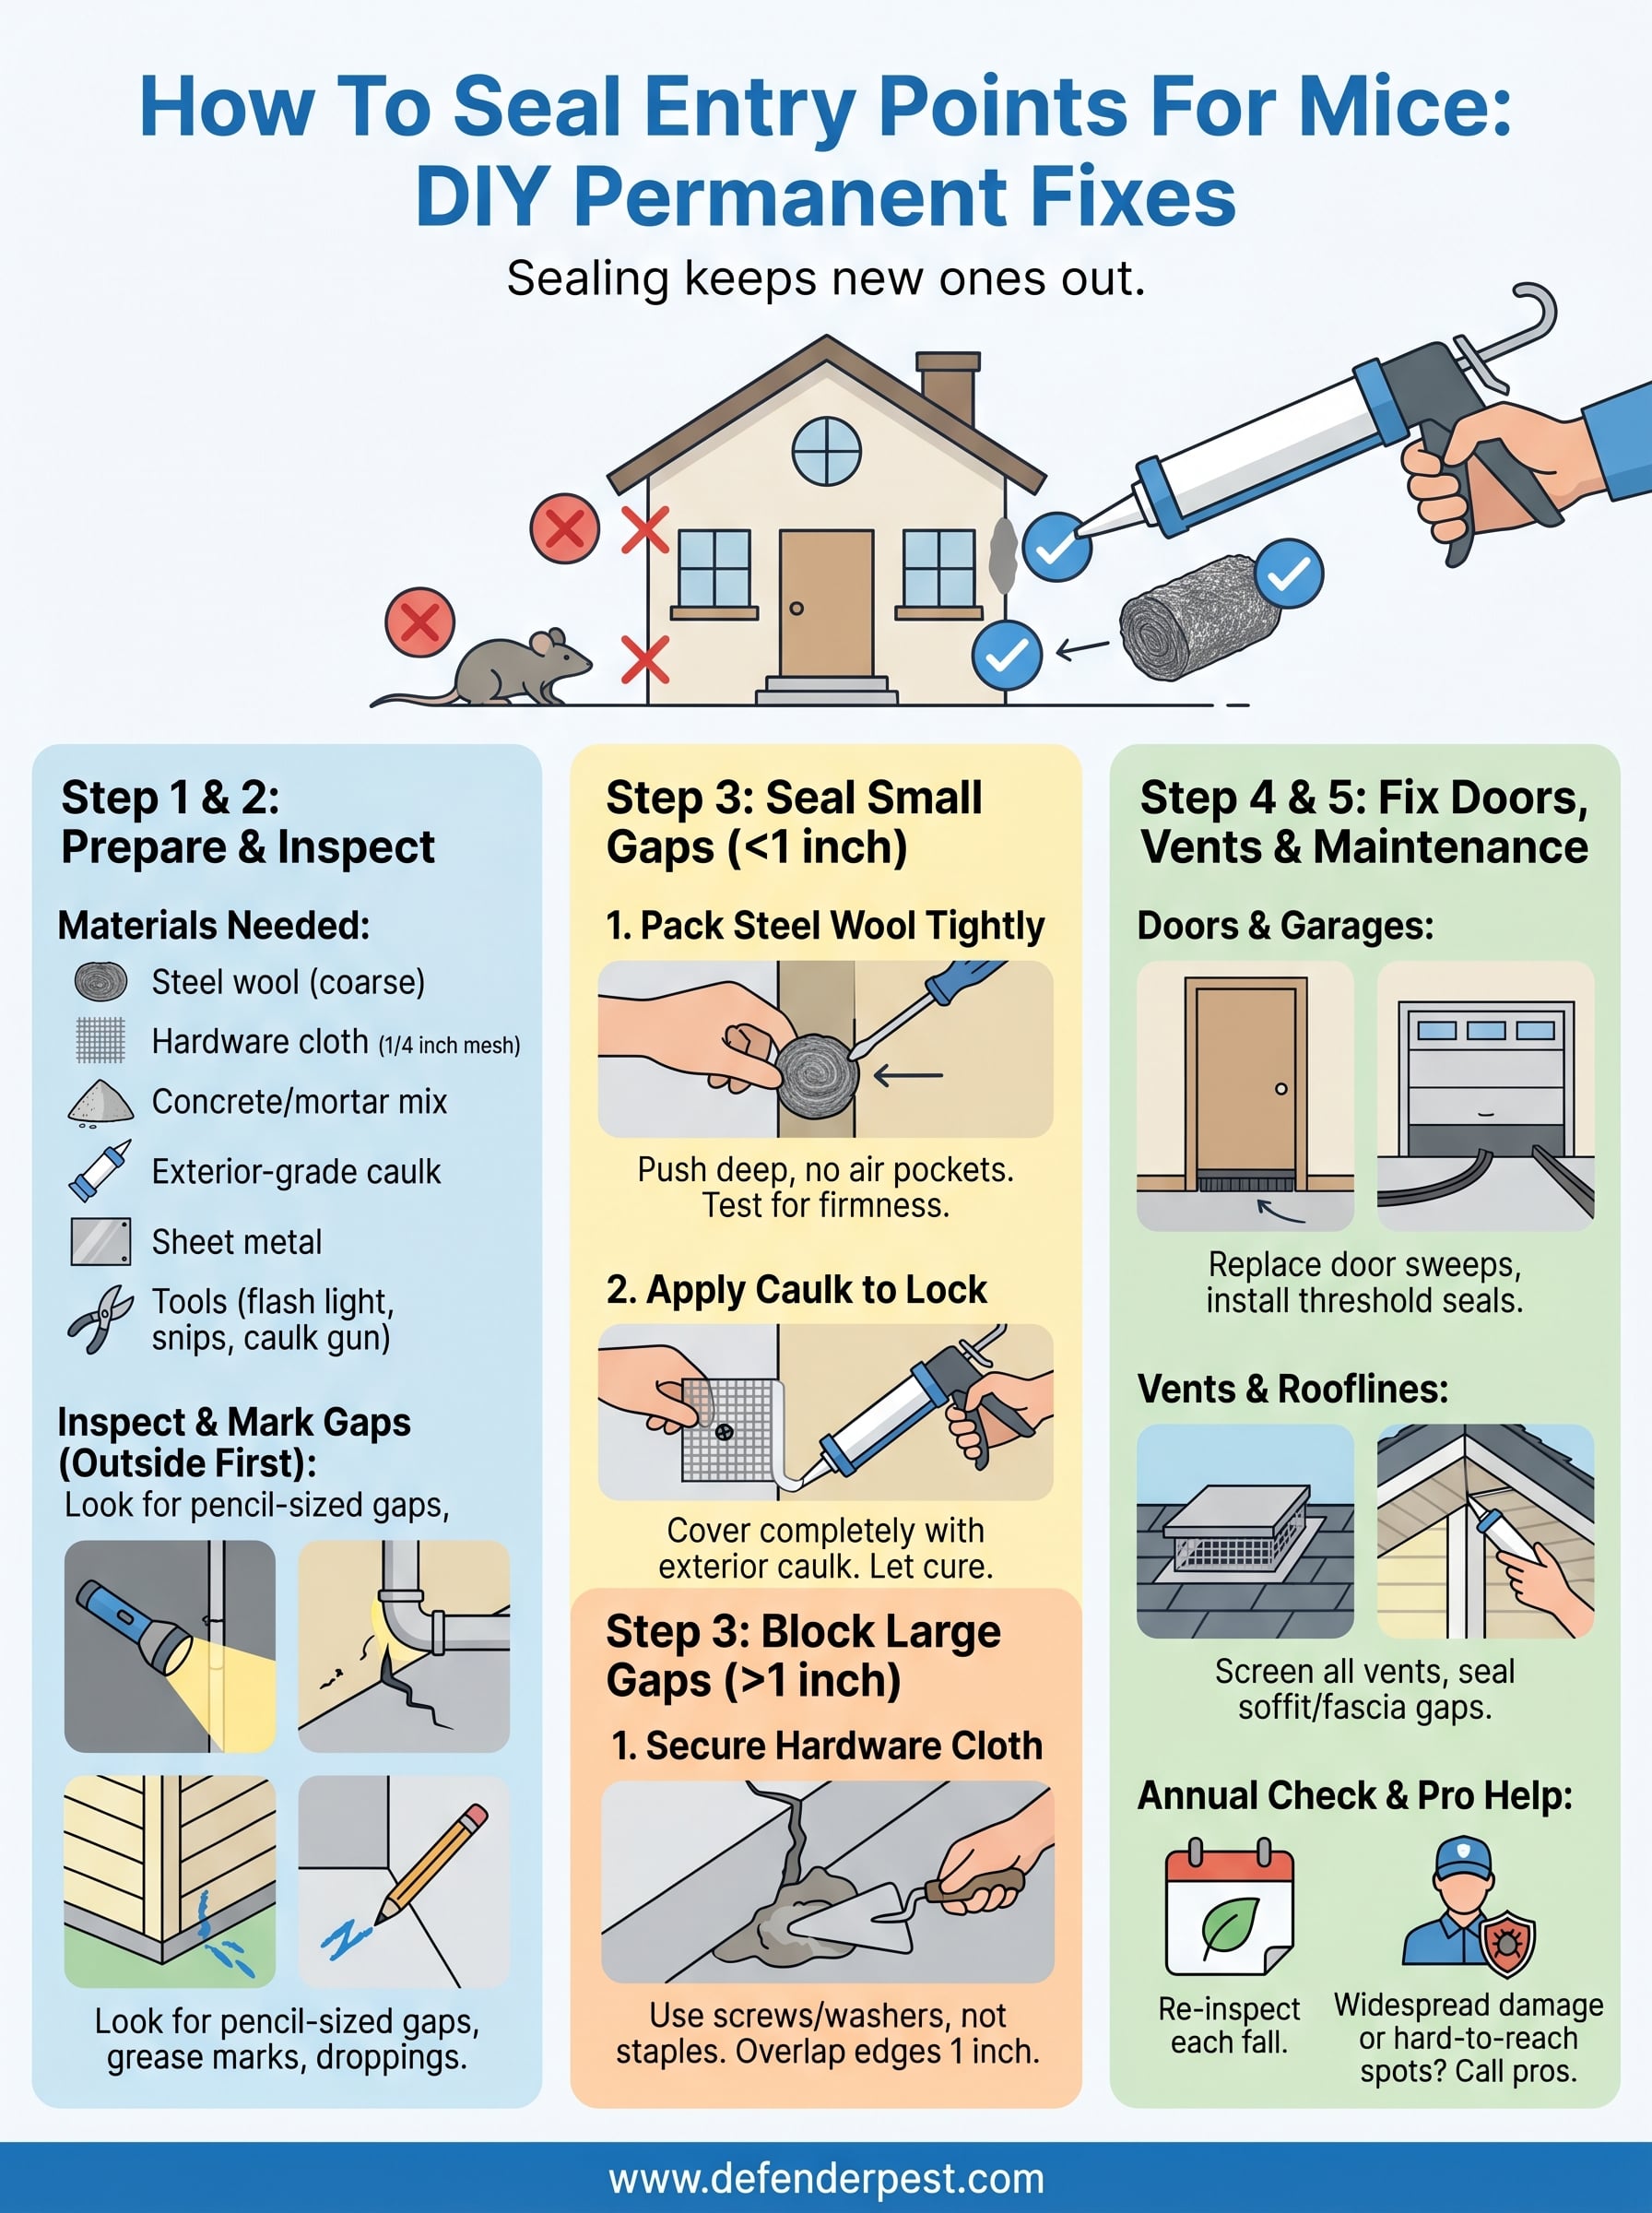
Before you inspect a single crack or stuff steel wool into any gap, gather everything on this list. Running back to the hardware store mid-project means leaving holes open longer, and mice can move fast when you're not watching . A complete supply run upfront keeps the job moving and ensures you have the right material for each type of opening you find. Most items cost under $30 total, and all of them are available at any major home improvement store.
Sealing materials
The materials you choose matter more than most people realize. Mice chew through foam, rubber, wood, and thin plastic with little effort, so your primary materials need to be ones they physically cannot gnaw through. For a permanent fix when learning how to seal entry points for mice, you need at least three sealing products that work together depending on the gap size and location around your home.
Steel wool is your most critical material. Mice cannot chew through it, and it packs easily into irregular-shaped gaps before you apply caulk over the top to lock it in place permanently.
Here's what to pick up before you start:
| Material | Best use | Notes |
|---|---|---|
| Steel wool (coarse grade) | Small gaps under 1 inch | Pair with caulk to lock it in place |
| Hardware cloth (1/4 inch mesh) | Large openings, vents, crawl spaces | Cut to size with tin snips |
| Concrete or mortar mix | Foundation cracks and masonry gaps | Completely chew-proof when cured |
| Sheet metal or flashing | Garage door gaps, large structural holes | Secure with screws, not adhesive |
| Exterior-grade caulk | Around pipes and wires | Use only as a secondary seal over steel wool |
Tools and safety gear
You likely already own most of the tools this job requires. A flashlight or headlamp is non-negotiable since most entry points hide in dark, tight spaces like crawl spaces, attic corners, and behind appliances. Protective gloves and a dust mask are essential for any work in attics or under-floor areas where old droppings may be present and airborne particles pose a real health risk.
Collect these before you start:
- Flashlight or headlamp
- Tin snips (for cutting hardware cloth)
- Wire cutters
- Caulk gun
- Putty knife or stiff brush (to clean gaps before sealing)
- Screwdriver or drill
- Measuring tape
Step 1. Inspect and confirm mouse entry points
Start outside before you ever go indoors. Mice typically enter through exterior gaps first , so walking the perimeter of your home on a dry day gives you the clearest view of what needs sealing. Bring your flashlight and a piece of chalk or masking tape to mark every suspect spot as you go, so nothing gets missed before you start patching.
Where to look outside your home
Work your way around the foundation, checking low to the ground where pipes, conduit, and utility lines enter the structure . Gaps around these penetrations are the most common entry points for mice, and they're easy to overlook because they sit close to the soil line or hide behind landscaping. Also check where siding meets the foundation, around basement window frames, and at any visible cracks in the masonry.

A gap you can fit a pencil through is wide enough for a mouse to enter, so treat every opening that size or larger as a confirmed problem.
- Pipe and conduit penetrations through the foundation or exterior walls
- Gaps at siding corners where panels meet
- Cracks in the foundation or concrete blocks
- Spaces around basement windows and window wells
- Roof-to-wall junctions and fascia board gaps
Signs that confirm active use
Once you understand how to seal entry points for mice effectively, identifying active versus inactive gaps saves you time and materials. Look for grease marks, fur smears, or concentrated droppings near a gap. Those are reliable signs that a hole is in regular use and should move to the top of your priority list.
Step 2. Seal small holes with steel wool and caulk
For gaps smaller than one inch, steel wool combined with exterior caulk is your most reliable fix. Steel wool alone won't stay put over time, and caulk alone gives mice something to chew through. Together they create a seal that resists both pressure and gnawing , which is exactly what you need when working through how to seal entry points for mice permanently.
Pack the steel wool first
Tear off a piece of coarse steel wool and press it firmly into the gap using a screwdriver or the eraser end of a pencil. Do not leave loose sections or air pockets since mice will pull at any slack they find and work it free over time. Push the wool deep enough that it sits slightly recessed below the surface, which gives the caulk a clean edge to grip when you apply it next.

Follow these steps in order for a tight, lasting pack:
- Tear off a golf ball-sized piece of coarse steel wool
- Press it deep into the gap until you feel solid resistance
- Add more wool if the gap is deep or wider than half an inch
- Check that no loose edges stick out past the wall surface
If the steel wool moves when you press it with one finger, it is not packed tightly enough to hold against a mouse pushing from the other side.
Apply caulk to lock it in
Once the steel wool is packed, load your caulk gun with exterior-grade caulk and run a full bead over and around the packed wool. Smooth it flat with a wet finger so it bonds completely to the surrounding surface. Do not leave thin spots at the edges where the bead meets the wall, since mice probe exactly those margins.
Allow the caulk to cure fully per the manufacturer's label before treating the hole as closed. Most exterior caulks hit full cure within 24 hours under dry conditions.
Step 3. Block large openings with metal and mortar
Gaps larger than one inch require heavier materials than steel wool and caulk can handle alone. For openings around crawl space vents, exposed foundation holes, and large pipe penetrations, you need hardware cloth or sheet metal backed by mortar to create a barrier that no mouse will chew or push through. This is where most DIY attempts fall short, and getting it right is central to learning how to seal entry points for mice permanently.
Cut and secure hardware cloth
Hardware cloth with a quarter-inch mesh is the right choice for covering large open areas like crawl space vents, weep holes, and any structural gap wider than an inch. Cut it to size with tin snips, leaving at least a one-inch overlap on all sides so the edges sit flush against solid material rather than spanning open space. Secure the cloth with screws and metal washers , not staples, which mice can eventually work free by pushing against the mesh repeatedly.
Hardware cloth attached only with staples will loosen over time, especially in areas exposed to temperature swings or moisture.
Fill foundation gaps with mortar
For cracks and voids in concrete block, brick, or poured foundations, mortar is the only long-term fix . Clean the gap with a stiff brush first to remove loose material, then pack premixed mortar firmly into the void using a putty knife. Work the mortar deep into the crack so it bonds to both sides of the opening rather than sitting on the surface. Allow it to cure for at least 24 hours before checking the repair for shrinkage cracks, which you can then fill with a second thin application.
Step 4. Fix doors, garage gaps, vents, and rooflines
Doors, garages, vents, and rooflines are among the most overlooked areas when people work through how to seal entry points for mice. Gaps here tend to be larger and shift more with seasonal temperature changes, which means standard caulk and steel wool often aren't enough on their own. Each location needs a specific fix matched to the material and gap type you're working with.
Doors and garage openings
The gap at the bottom of your exterior doors is one of the most common mouse entry routes into a home. Replace worn door sweeps on all exterior doors with a heavy-duty rubber or aluminum sweep that contacts the threshold with no visible daylight underneath. Garage doors need particular attention since standard rubber seals degrade and pull away from the concrete floor over time, leaving a gap wide enough for mice to pass through easily.
Slide a piece of paper under your closed exterior door. If it moves freely, replace the sweep before you seal anything else.
- Replace door sweeps on all exterior entry doors
- Install a garage door threshold seal along the concrete floor
- Check side and top garage door weatherstripping for compression gaps
Vents and rooflines
Roof vents, soffit openings, and gable vents are entry points that mice reach by climbing, not by crawling along the ground. Cover every vent with quarter-inch hardware cloth secured with screws , and inspect where fascia boards meet the soffit for any separation that daylight passes through. Seal those gaps with exterior-grade caulk and check them again each fall before temperatures drop.
Key roofline spots to inspect and seal:
- Gable vents without mesh backing
- Soffit-to-fascia gaps along the roof edge
- Ridge vents with damaged or missing screens
Keep your home mouse-free from here
You now have a complete process for how to seal entry points for mice , from inspecting the perimeter to patching the roofline. Work through the steps in order, confirm each repair is solid before moving on, and re-inspect every sealed gap each fall before Sacramento temperatures push mice to look for warmth indoors. One annual walk-around catches new cracks and weathered seals before they become entry points.
Some situations go beyond what DIY fixes can handle. If you find widespread gnawing damage, active nesting, or gaps you can't safely reach , a professional assessment saves you time and prevents the problem from growing. Defender Termite & Pest Management has served homeowners across the Greater Sacramento area since 1999, and our team knows exactly where mice hide and how to shut them out for good. Contact us today through our rodent control services page to get an estimate.