How To Prevent Mice From Entering Your Home
A single mouse can squeeze through a gap the size of a dime. That means most homes, especially older ones common across Sacramento, Roseville, and Elk Grove, have dozens of potential entry points hiding in plain sight. If you're searching for how to prevent mice from entering your home , the good news is that most of the work comes down to a few practical steps you can start today. The bad news? Miss even one opening , and mice will find it.
At Defender Termite & Pest Management, we've been solving rodent problems for Sacramento-area homeowners since 1999. We've crawled under enough houses to know exactly where mice get in and what actually keeps them out. This guide walks you through the same process our technicians follow, sealing entry points , cutting off food sources, and setting up deterrents, so you can mouse-proof your home with confidence.
What you need to mouse-proof your home
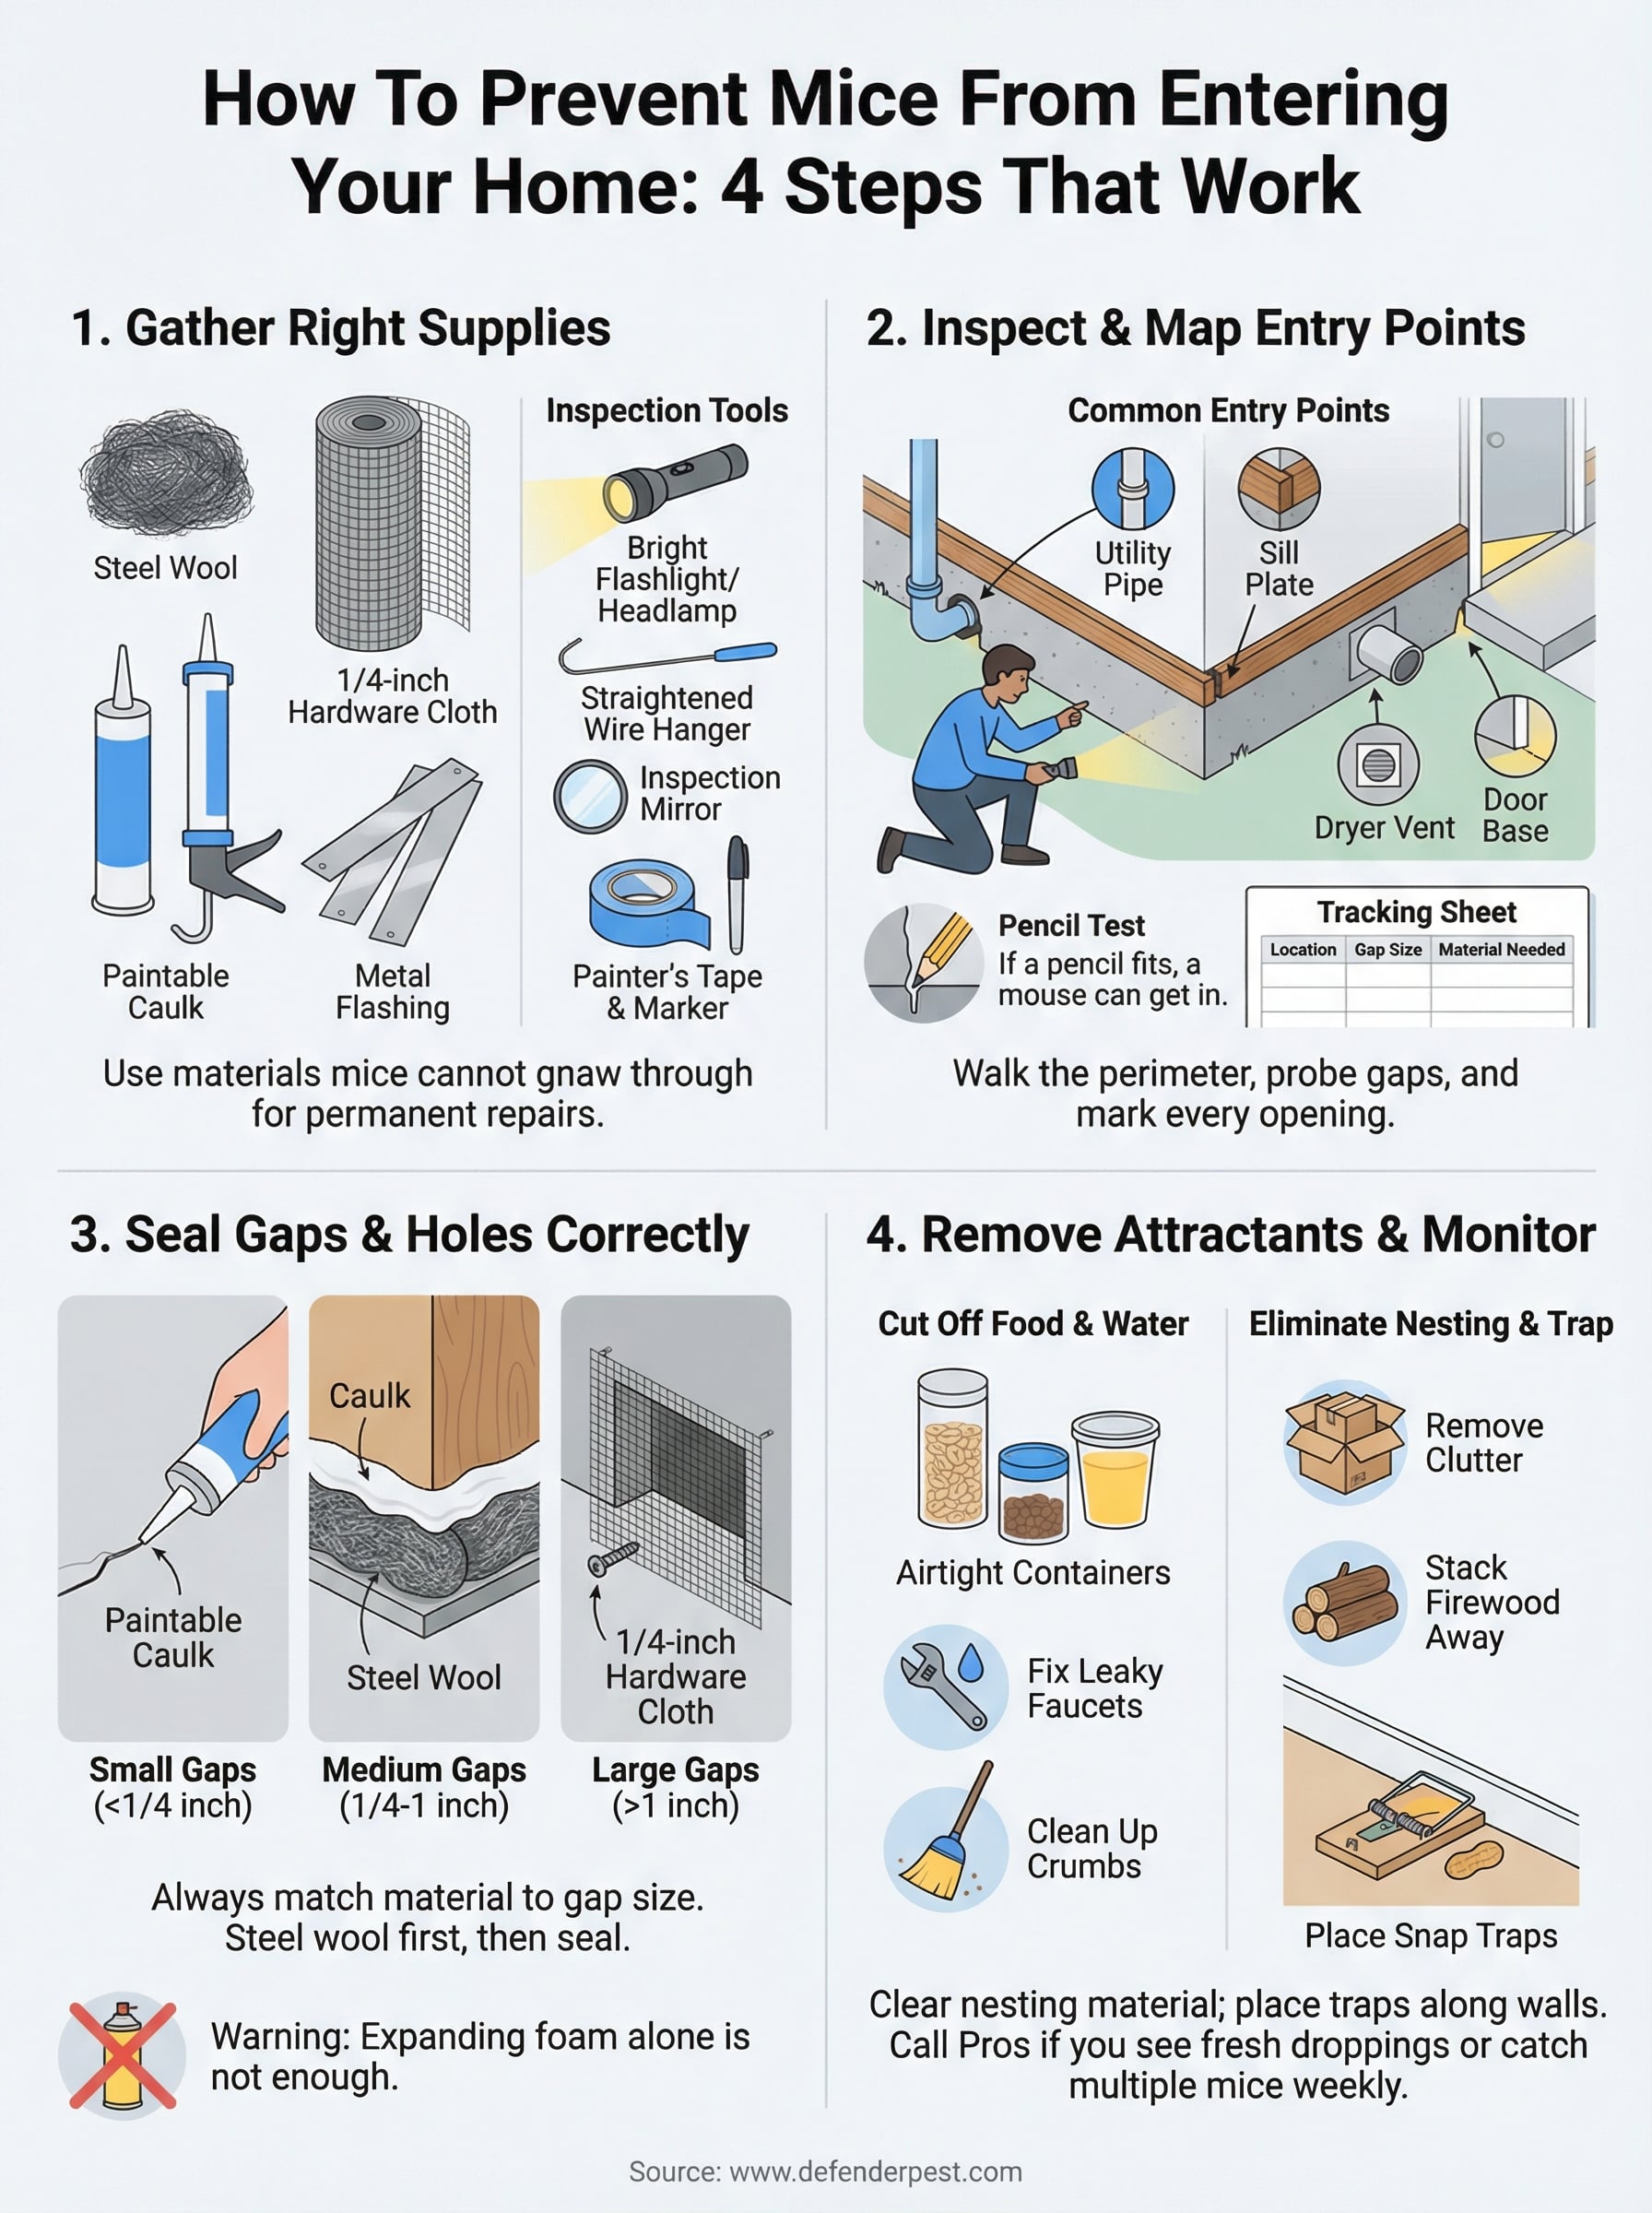
Before you start patching anything, gather the right supplies. Cheap or wrong materials will fail fast since mice gnaw through plastic, rubber, and thin wood without much effort. Understanding how to prevent mice from entering your home starts with using products they physically cannot chew through , so your repairs hold up over time rather than giving way in a week.
Sealing materials
Steel wool and paintable caulk are your two most important sealing products. Mice cannot bite through steel wool, and caulk locks it in place inside cracks and pipe gaps. For larger openings such as crawl space vents or foundation gaps, use 1/4-inch galvanized hardware cloth secured with screws or staples. Expanding foam alone will not stop mice since they chew through it easily. Use it only after packing the void with steel wool or copper mesh first.
Here is a quick checklist of sealing materials to have ready before you start:
- Coarse steel wool for stuffing gaps before caulking
- Paintable caulk for gaps under 1/4 inch around pipes and baseboards
- 1/4-inch hardware cloth for vents, crawl space openings, and large gaps
- Metal flashing or sheet metal for gaps along garage edges and door bases
- Aluminum door sweeps with a vinyl seal for exterior doors with daylight showing underneath
Inspection tools
Finding every gap requires the right gear. A bright flashlight or headlamp is non-negotiable for checking crawl spaces, attics, and the undersides of cabinets where mice travel most. Bring an inspection mirror to see behind appliances and inside wall voids without guessing.
A straightened wire coat hanger lets you probe hidden gaps and confirm whether an opening connects to deeper wall voids, which helps you decide how much filler to use.
Keep a roll of painter's tape and a marker nearby to flag each gap as you find it, so nothing gets skipped when you move to the sealing phase.
Step 1. Inspect and map entry points
Walk the full perimeter of your home before you touch any materials. Mice follow pipes, wires, and wall edges , so those areas need the closest attention. Grab your flashlight and marker, crouch down at foundation level, and work your way around the outside methodically rather than jumping between spots at random.
Common entry points to check
Start with the areas that let most mice in. Gaps where utility pipes enter the foundation are responsible for a large share of infestations, so probe each one with your wire hanger to feel how deep the void goes. Check where the sill plate meets the foundation, around dryer vents, and along the bottom edge of every exterior door.

If you can slide a pencil into a gap, a mouse can fit through it, so mark every opening you find no matter how small it looks.
Use a tracking sheet like the one below to document each gap before moving to the sealing phase:
| Location | Approximate gap size | Material needed |
|---|---|---|
| Dryer vent left side | 1/2 inch | Hardware cloth |
| Kitchen pipe under sink | 1/4 inch | Steel wool + caulk |
| Garage door bottom right | 3/4 inch | Door sweep |
Mapping each gap on paper keeps you from missing openings once you move on to the next step.
Step 2. Seal gaps and holes the right way
Now that you have your map, work through each gap systematically. Starting at the lowest point of your foundation and moving upward reduces the chance of missing openings that mice use most often. Apply your materials in the correct order: steel wool or copper mesh first , then caulk or hardware cloth on top to lock everything in place.
Match the material to the gap size
Small gaps under 1/4 inch respond well to paintable caulk applied directly over the crack. For gaps between 1/4 and 1 inch, pack the void with coarse steel wool before sealing it with caulk. Openings larger than 1 inch, like vent covers or foundation breaks, need 1/4-inch hardware cloth cut to size and screwed into place.
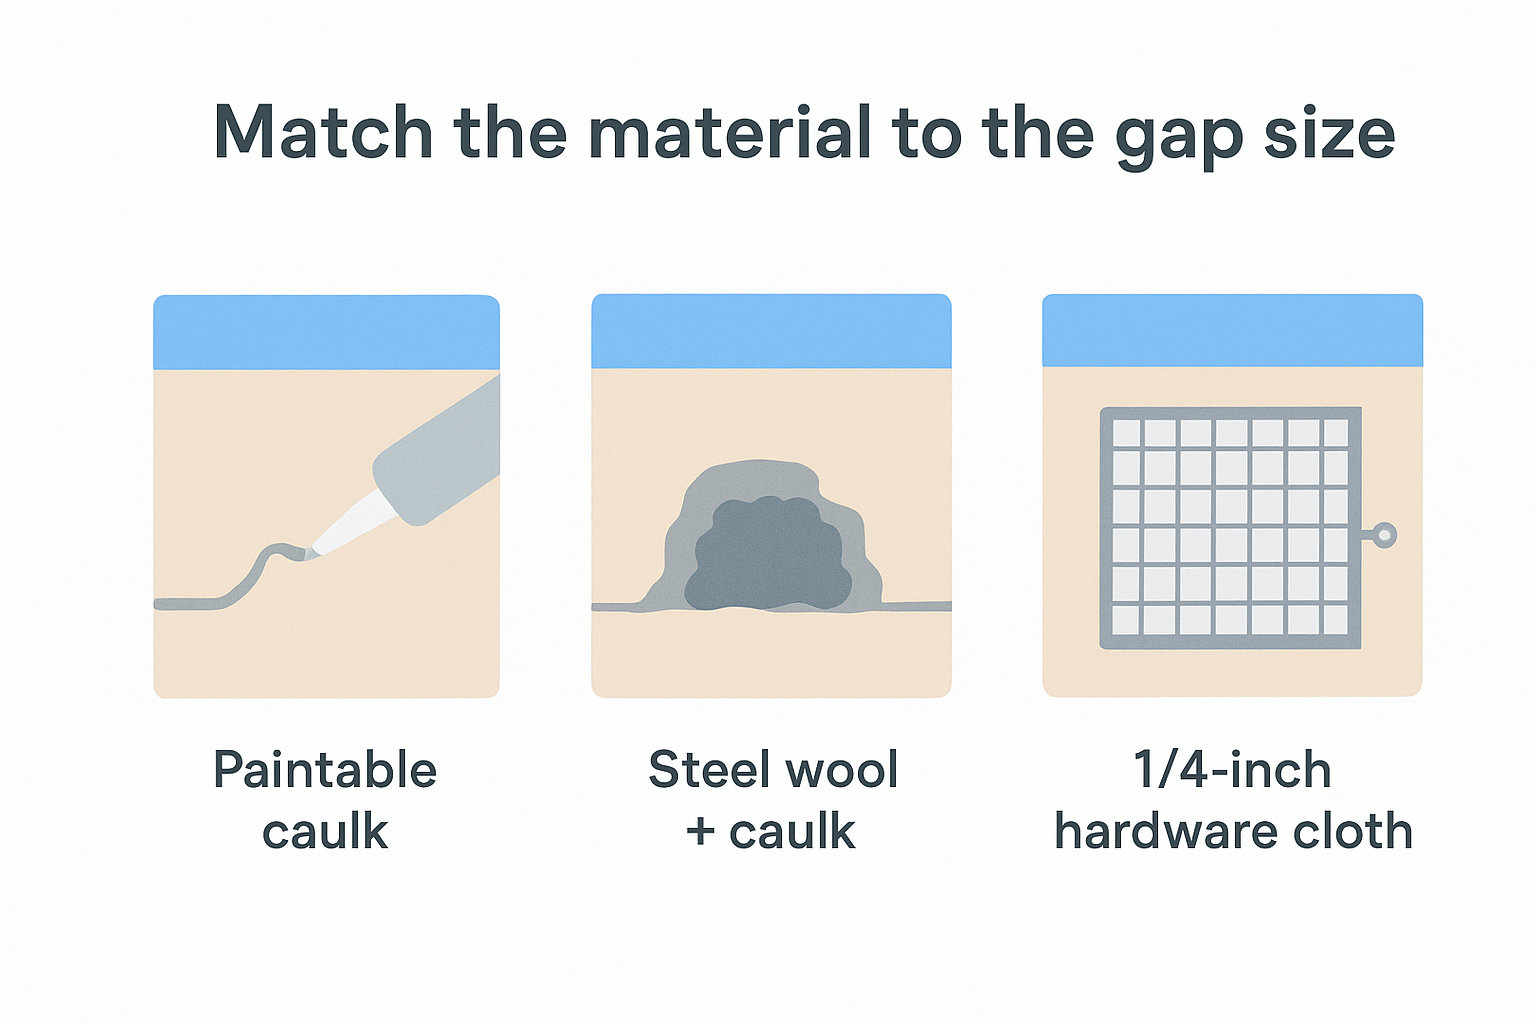
Expanding foam without a steel wool backing gives mice a soft target they can gnaw through in a single night, so never use it alone on exterior gaps.
Knowing how to prevent mice from entering your home means prioritizing permanent repairs over quick patches . Check every sealed gap again after 30 days to confirm the material held and that no new gnaw marks or droppings have appeared nearby.
Step 3. Remove food, water, and nesting spots
Sealing gaps stops mice from getting inside, but easy food and water access keeps them coming back. Knowing how to prevent mice from entering your home means cutting off what draws them in the first place, not just blocking where they enter.
Cut off food and water sources
Store all dry goods in airtight containers made of glass or hard plastic since mice chew through cardboard and thin plastic bags overnight. Fix dripping faucets and leaky pipes as well, because even small water sources attract rodents, especially during dry summer months.
Never leave pet food out overnight. Mice are most active between dusk and dawn, so an open bowl is a direct invitation.
- Move cereals, grains, and pet food into hard plastic or glass containers
- Keep trash cans indoors with tight-fitting lids
- Clean up crumbs and spills every evening before bed
Eliminate nesting material
Mice build nests from paper, cardboard, and loose insulation , so limit what you leave scattered in garages, attics, and closets. Replace cardboard boxes with sealed plastic bins to eliminate the materials they nest in.
- Clear out old newspapers, fabric scraps, and loose packing material from storage areas
- Stack firewood at least 20 feet away from the house
Step 4. Monitor, trap, and know when to call help
Sealing gaps and removing food sources covers the foundation of how to prevent mice from entering your home , but traps give you a reliable way to catch any mice already inside and confirm whether new ones are getting through. Place snap traps rather than glue boards, since snap traps kill quickly and are far easier to reset without direct contact.
Set traps in the right spots
Position traps along walls and behind appliances , not in open floor space. Mice run tight to surfaces, so a trap placed in the middle of a room will rarely trigger. Peanut butter works best as bait since it sticks to the trigger and forces the mouse to press down hard to eat it.
Check every trap every 24 hours, and move any that stay empty after three days to a new location closer to a wall edge or cabinet base.
Signs you need professional help
If you notice fresh droppings daily , hear scratching inside walls after sealing every visible gap, or catch more than two mice in a single week, the infestation is larger than DIY methods can address on their own. A professional can access areas you cannot , including inside wall voids, under concrete slabs, and deep inside crawl spaces where mice often nest without any surface signs.
Keep mice out for good
Mouse-proofing your home is not a one-time project. Gaps reopen , materials shift, and new cracks form every season, especially after heavy rain or temperature swings that cause wood and concrete to expand and contract. The steps above cover exactly how to prevent mice from entering your home, but staying ahead of the problem means repeating your perimeter inspection every six months and replacing any sealing materials that show wear or gnaw marks.
If you follow this process and still find signs of activity, the infestation has likely moved deeper into areas like wall voids or under the foundation where standard DIY access is limited. At that point, professional help gets results faster and more completely than additional trapping or patching on your own. Contact Defender Termite & Pest Management for rodent control service in Sacramento and the surrounding area, and get an assessment from a team that has handled these situations since 1999.