Mouse and Rodent Control: How to Get Rid of Mice for Good
Mouse and Rodent Control: How to Get Rid of Mice for Good
You've seen the droppings behind the pantry, heard the scratching in the walls at night, or found a chewed corner on a cereal box. That's enough to send anyone searching for mouse rodent control that actually works, not another trap that sits empty while the mice keep breeding. If you're in Sacramento, Roseville, Folsom, or anywhere nearby, you already know these pests don't wait for a convenient time to move in.
Getting rid of mice for good means combining exclusion, sanitation, and targeted trapping or baiting , not just setting a snap trap and hoping. A single mouse can squeeze through a gap the size of a dime and produce dozens of offspring in a few months, so half-measures buy you time, not results. Real mouse and rodent control starts with finding the entry points and food sources, then closing them off permanently.
In this guide, we'll walk through how to identify a rodent problem early, the DIY steps worth trying first, and when a professional inspection makes more sense than another trip to the hardware store. We've handled Sacramento-area infestations since 1999, so what follows comes from what actually gets mice out of houses and keeps them out.
Why mice invade homes and how to spot an infestation
Mice come inside for the same three reasons every year: food, warmth, and a safe place to nest. As Sacramento temperatures drop in late fall, house mice and deer mice start looking for shelter, and a house full of pantry staples, pet food, and cluttered garages looks like an ideal home. Cooler weather pushes rodent activity indoors faster than most homeowners expect, often by early October, well before anyone notices a problem.
Common signs of a rodent infestation
Most people don't see the mouse itself first. They see the evidence it leaves behind, and that evidence tells you a lot about how bad the problem already is.
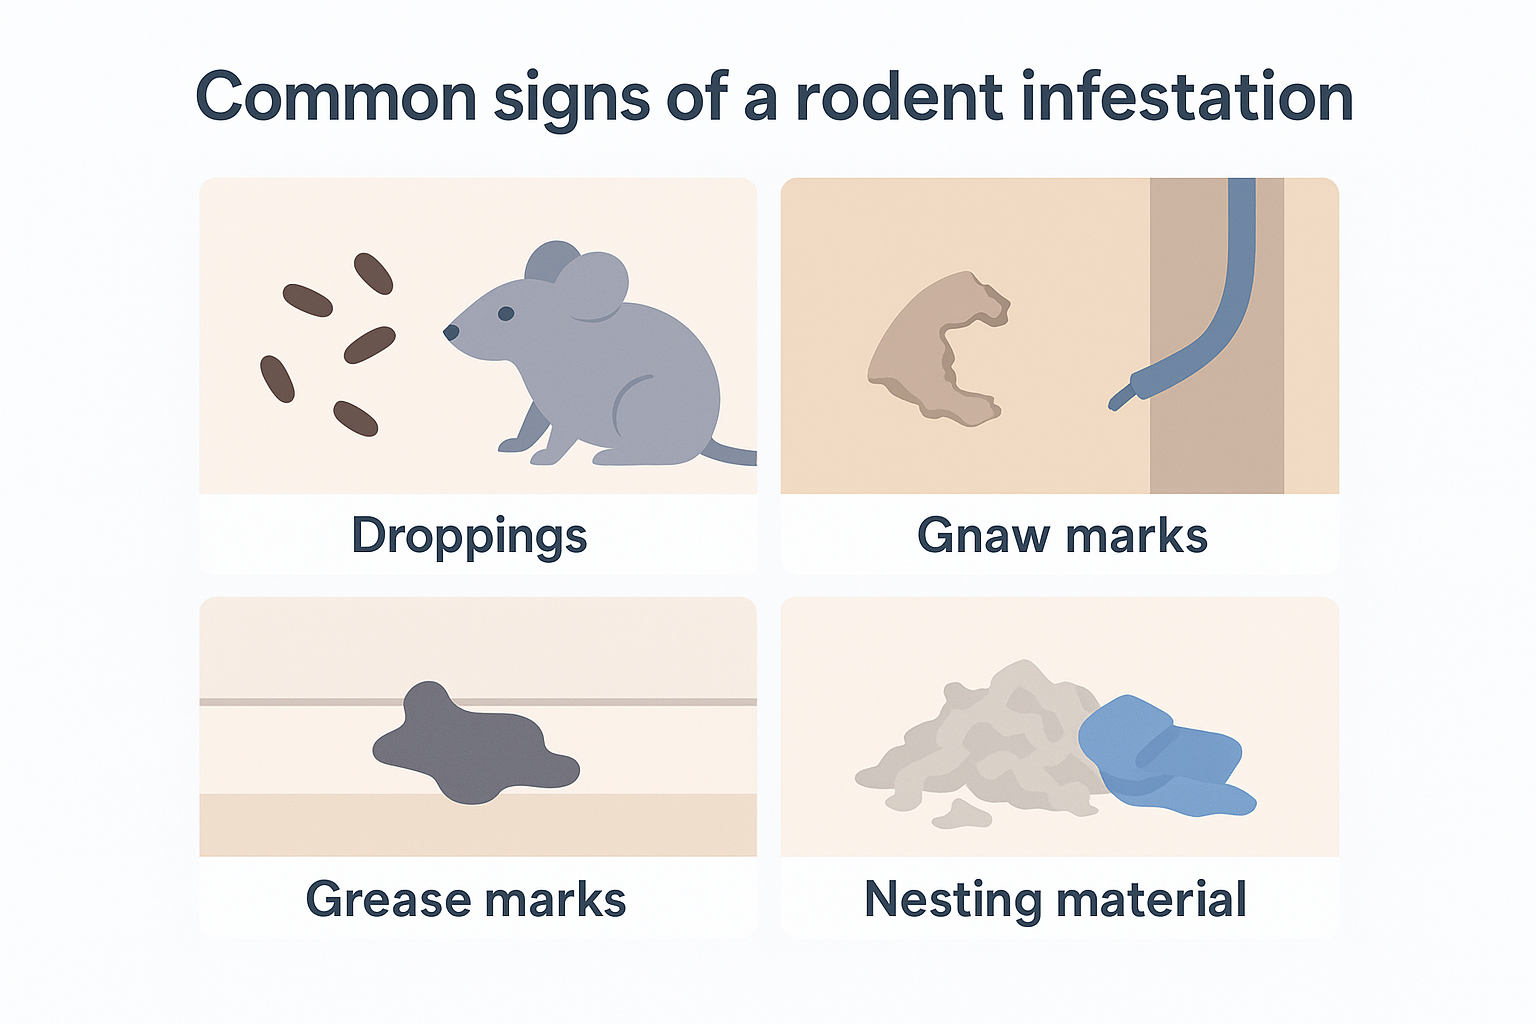
- Droppings shaped like small dark grains of rice, usually clustered near food sources or along walls
- Gnaw marks on cardboard, wood, wiring, or plastic containers
- Grease marks or dark smudges along baseboards where mice rub against surfaces repeatedly
- Scratching or scurrying sounds in walls, ceilings, or attics, especially at night
- Nesting material like shredded paper, insulation, or fabric tucked into hidden corners
- A strong, musky odor in enclosed spaces such as closets or under sinks
One mouse rarely stays one mouse for long, so any sign you find is a signal to act, not wait.
Why a single sighting means more than you think
Here's the part that catches homeowners off guard: seeing one mouse almost never means there's only one mouse. House mice reach sexual maturity in about six weeks and can produce a litter of five to six pups roughly every three weeks. Do that math over a single season and one pair can theoretically lead to dozens of descendants. That's why effective rodent control treats every sighting as evidence of a colony, not an isolated visitor.
Age and construction of your home matter too. Older houses in established Sacramento neighborhoods often have gaps around old pipe fittings, warped siding, or foundation cracks that newer builds don't have. Homes near creeks, greenbelts, or agricultural land also see more pressure from field mice looking to move indoors as outdoor food sources dry up. If your property borders open space or you've had recurring issues in past years, you're statistically more likely to see mice again unless the underlying entry points get addressed.
What attracts mice specifically to your property
Understanding the pull factors helps you prioritize where to focus your efforts first:
| Attractant | Common source | Why it matters |
|---|---|---|
| Food | Pet bowls, birdseed, unsealed pantry items | Mice need very little food to survive and thrive |
| Water | Leaky pipes, condensation, pet water dishes | A consistent water source lets colonies grow faster |
| Shelter | Clutter, wall voids, insulation, stacked firewood | Provides warmth and protection from predators |
| Access | Gaps under doors, vents, utility line penetrations | Entry points as small as a quarter-inch let mice through |
The CDC's guidance on rodent-borne diseases is worth a look too, since mouse infestations aren't just a property nuisance. Droppings and urine can carry hantavirus and salmonella, which makes early detection more than a matter of convenience.
Step 1. Remove food, water, and shelter sources
Before you buy a single trap, take away the reasons mice want to be in your house in the first place. Sanitation work doesn't get mice out overnight, but it starves out any colony that's already inside and makes your home far less attractive to new arrivals. Skip this step and you'll be resetting traps indefinitely while the real problem, an easy food supply, stays untouched.
Cut off the food supply
Start in the kitchen and pantry, since that's where most infestations get their fuel. Mice only need a few grams of food a day, so even small amounts of exposed cereal, pet kibble, or birdseed keep a colony fed.
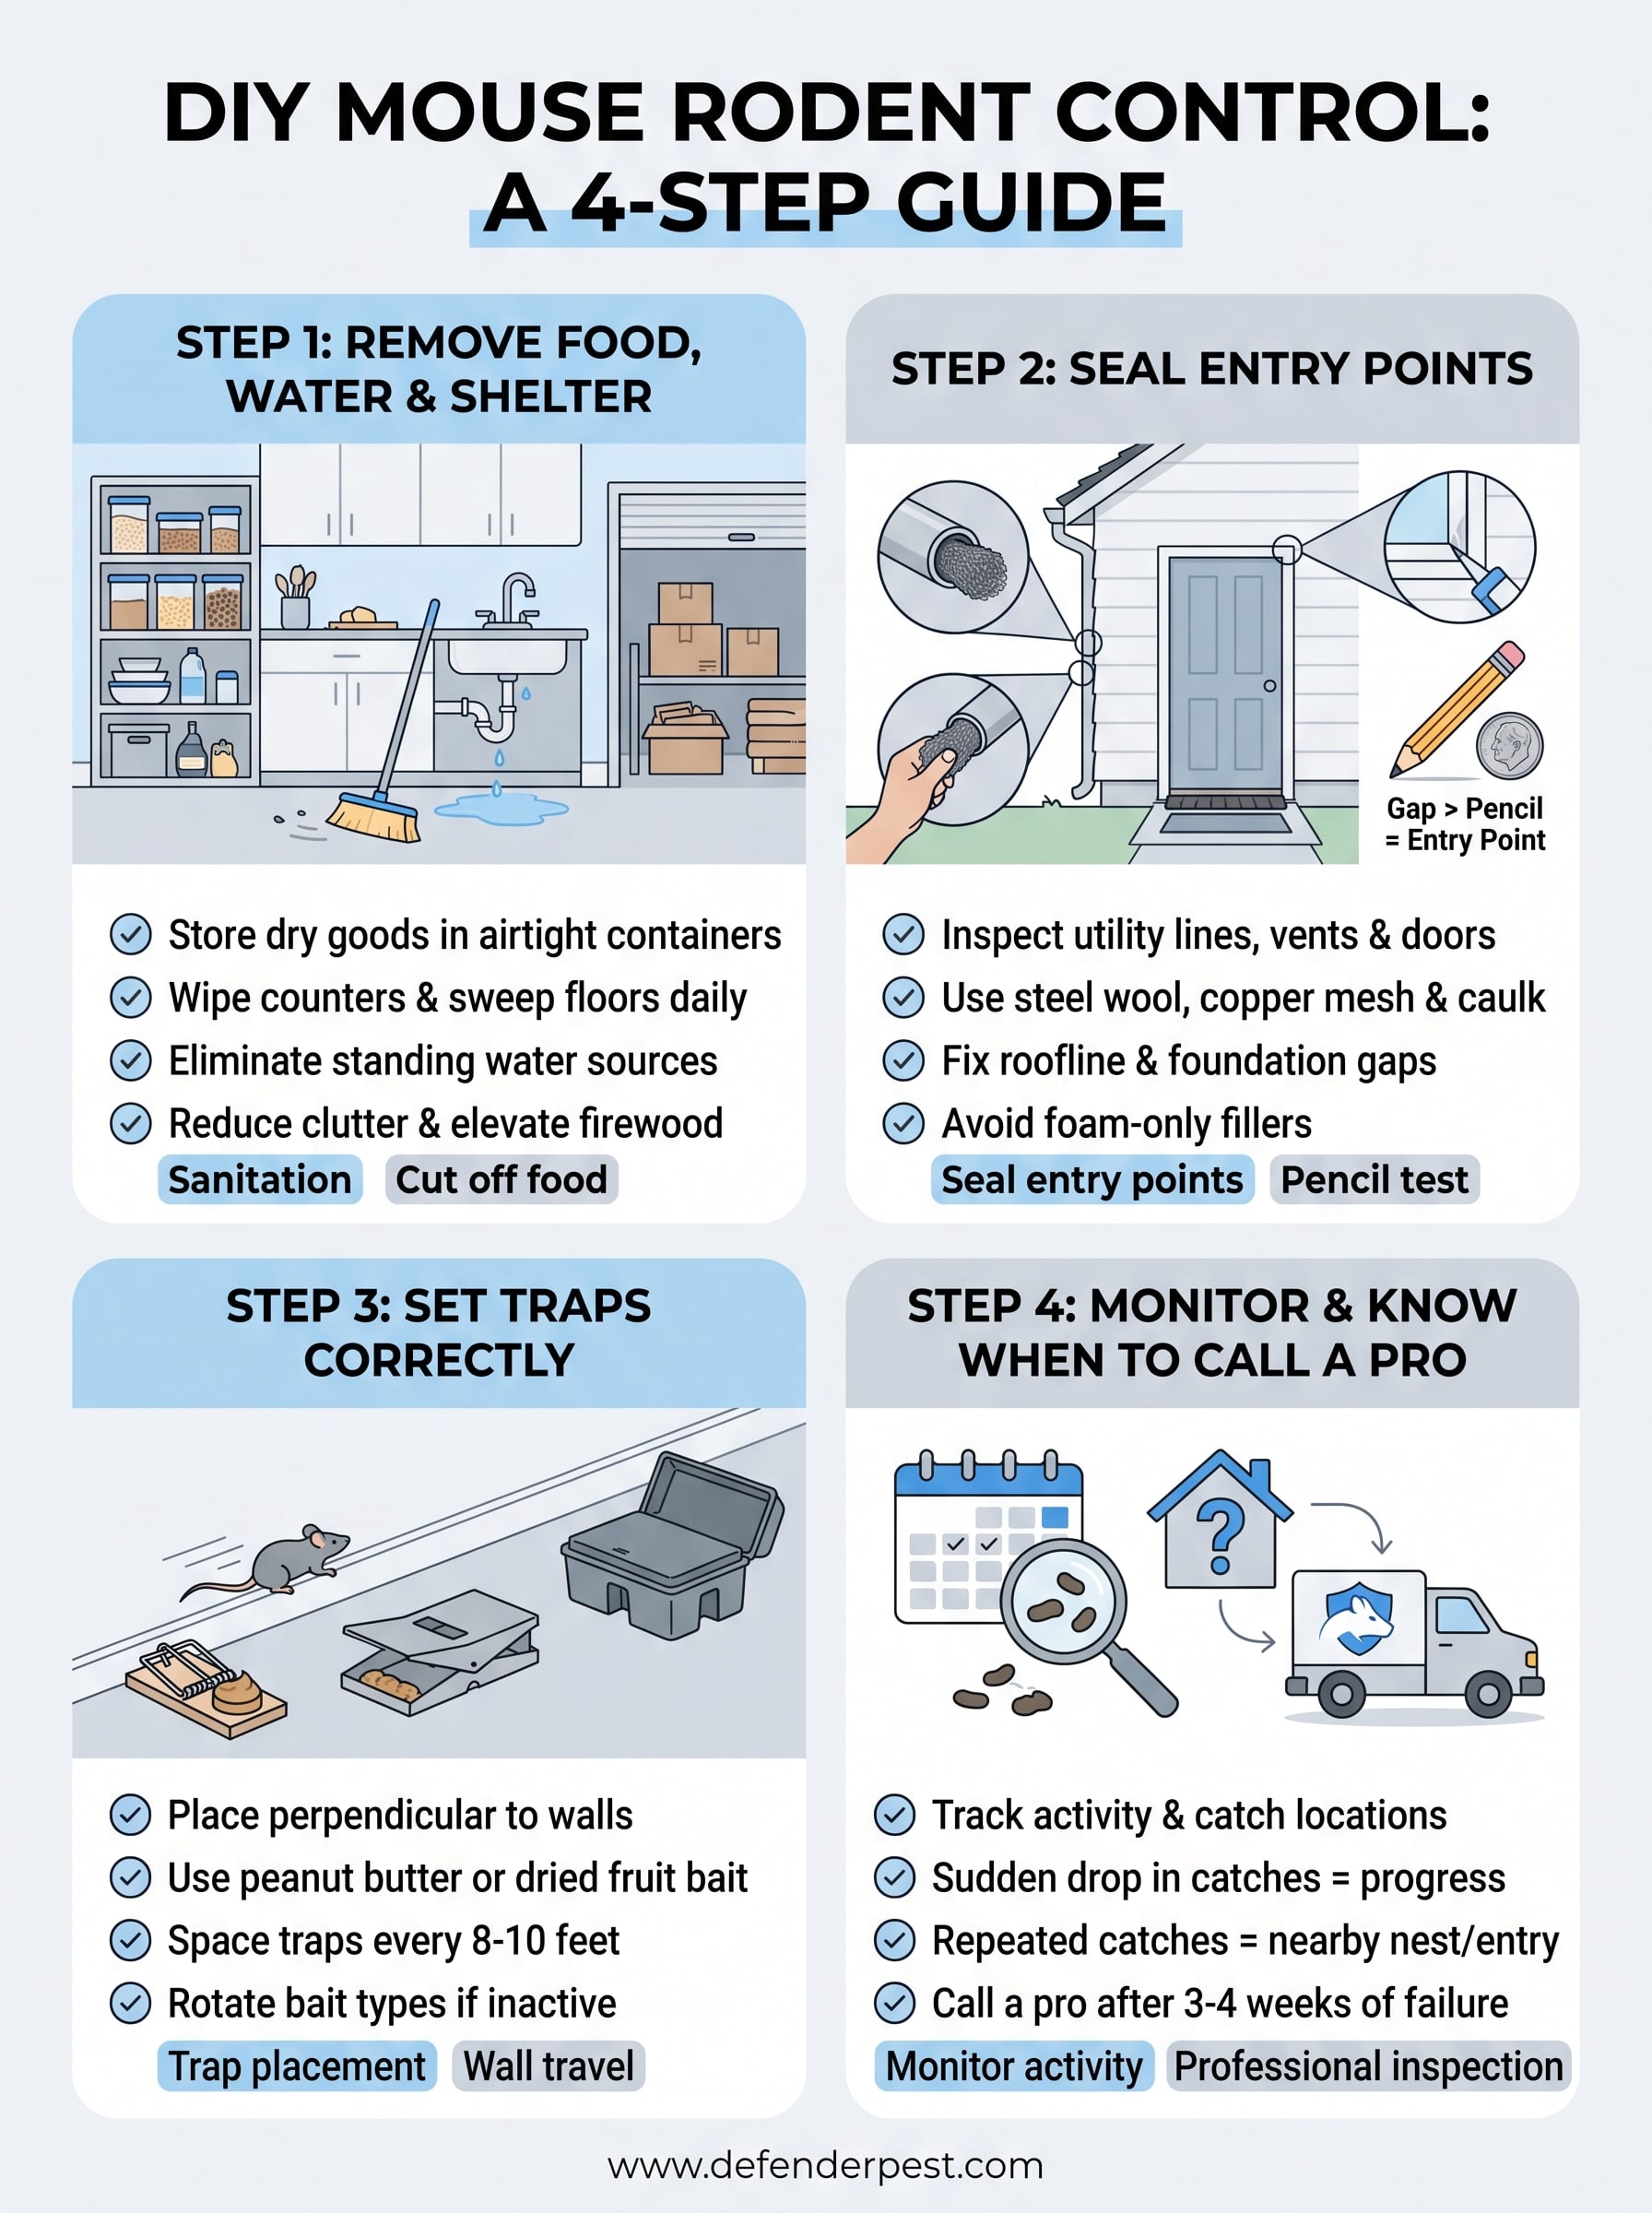
- Store dry goods in airtight containers, not the original cardboard or plastic bags
- Wipe down counters and sweep floors nightly to remove crumbs
- Move pet food bowls after feeding time instead of leaving them out overnight
- Clean up birdseed spills under feeders at least weekly
- Take garbage out regularly and use bins with tight-fitting lids
Eliminate standing water
Mice can survive on very little water, but a consistent water source lets a population grow faster than a dry environment would allow. Fix dripping faucets, insulate sweating pipes, and empty any trays or saucers that collect water under houseplants or in crawl spaces. Basements and garages with poor drainage deserve a second look, since a damp corner nobody visits is exactly where mice like to nest.
Cut off food and water long enough, and even a well-established colony starts thinning out on its own.
Clear out shelter and clutter
Stacked boxes, old furniture, and unused firewood piled against the house all create the warm, hidden spaces mice need to nest and raise litters. Reduce clutter in garages, attics, and storage areas, and keep firewood stacked at least 18 inches off the ground and away from exterior walls. Trim back shrubs and tree branches touching the house, since overgrown landscaping gives mice a direct bridge from the yard to your roofline. Once food, water, and shelter are gone, the entry points you seal next actually matter.
Step 2. Seal entry points to mouse-proof your home
Once you've removed the food and shelter that keep mice fed, the next job is closing off how they get in. A mouse only needs a gap the width of a pencil to squeeze through, so sealing entry points matters more than most homeowners assume when they're just patching the obvious holes. Walk the perimeter of your house slowly, at ground level, and check every spot where two materials meet: siding to foundation, pipes to walls, vents to trim.

Inspect the usual weak spots
Start with these areas, since they account for most rodent entry into Sacramento-area homes:
- Gaps around utility lines, cable entry points, and dryer vents
- Foundation vents and crawl space openings without intact screens
- Door thresholds and garage door seals with visible daylight underneath
- Gaps around window frames, especially on older homes with settled framing
- Roofline gaps where eaves meet the fascia or where rooflines don't sit flush
If you can slide a pencil through a gap, a mouse can already fit through it.
Choose the right sealing material
Not every gap calls for the same fix, and using the wrong material means redoing the work within a year.
| Gap type | Best material | Why it works |
|---|---|---|
| Small cracks and joints | Steel wool packed with caulk | Mice can't chew through steel fibers |
| Larger holes around pipes | Copper mesh or hardware cloth | Rigid enough to resist gnawing |
| Foundation vents | Metal screen replacement | Withstands weather and chewing |
| Door gaps | Weatherstripping or door sweeps | Blocks access without affecting use |
| Roofline and soffit gaps | Rigid metal flashing | Prevents climbing rodents from squeezing in |
Avoid foam or plastic fillers on their own. Rodent-proof sealing relies on materials mice physically can't chew through, and foam alone just becomes another chew toy. Combine steel wool with caulk for small gaps, and use metal flashing or hardware cloth for anything larger than a half-inch.
Work from the roofline down to the foundation so you don't miss a section, and check your work again about a month later. Settling, weather, and even squirrels can reopen gaps you thought were closed, and a second pass catches problems before mice find them first.
Step 3. Set traps and bait stations correctly
With food sources cut off and entry points sealed, trapping finally works the way it's supposed to. Trap placement matters more than trap choice, since even the best snap trap catches nothing sitting in the middle of an open room. Mice travel along walls and through tight spaces, so that's exactly where your traps belong.
Pick the right trap for the situation
Different traps solve different problems, and using the wrong one wastes weeks:
| Trap type | Best use case | Notes |
|---|---|---|
| Snap traps | Fast-acting kills in active areas | Check and reset every 24 hours |
| Multi-catch traps | Homes with several mice | Can hold multiple mice before emptying |
| Glue boards | Low-clutter tracking of activity | Less humane, use sparingly |
| Bait stations | Perimeter and exterior control | Keeps bait secured from kids and pets |
Place traps where mice actually travel
Set traps perpendicular to walls, with the trigger end facing the wall, since mice run along baseboards rather than through open floor space. Bait with peanut butter or a small amount of dried fruit rather than cheese, which dries out and loses its pull within a day. Space traps every 8 to 10 feet along suspected travel paths, including behind appliances, inside cabinets, and near any entry point you sealed but still suspect is active.
A trap set in the open catches dust, not mice. Location decides success more than bait ever does.
Rotate bait types if you're not seeing activity after a few days, since mice can grow suspicious of the same scent repeated night after night. Check traps every morning, dispose of catches promptly, and disinfect the area afterward, since droppings and urine near a catch site still carry health risks. Outdoor bait stations work well for perimeter control but should always be tamper-resistant and locked, especially with kids or pets around. If you're using rodenticide, follow label instructions exactly. The EPA's guidance on rodenticide use explains placement rules meant to keep bait away from non-target animals.
Step 4. Monitor activity and know when to call a pro
Once traps are set and gaps are sealed, the work shifts from action to observation. Monitoring activity for one to two weeks tells you whether your DIY effort actually solved the problem or just slowed it down. Keep a simple log of what you catch and where, since patterns in trap activity point straight to whatever access point or food source you missed the first time around.
Track what your traps tell you
A sudden drop in catches usually means you've broken the back of the infestation, while steady activity in the same spot points to a nest nearby that hasn't been found yet. Watch for these signals over your monitoring window:
- Zero catches for 5 to 7 days after initial activity: likely resolved, keep traps out another week to confirm
- Repeated catches in one location : a nest or entry point close by hasn't been addressed
- New droppings appearing after cleanup : fresh mice have found a way back in
- Activity spreading to new rooms : population is larger than initially estimated
Traps that keep catching mice in the same spot aren't a sign your plan failed, they're pointing you straight at what you missed.
When DIY stops being enough
Some situations call for a professional inspection rather than another round of traps. If you're still catching mice after three to four weeks of consistent sanitation, sealing, and trapping, something structural is letting them back in, and that's harder to spot without training and the right tools. Homes with wall voids, crawl spaces, or attic access mice have already claimed as nesting sites often need thermal cameras or borescopes to find the exact entry points.
Commercial properties face an added layer of urgency, since health code violations from rodent activity can shut down operations fast. Real estate transactions add pressure too, since a termite or pest inspection report showing active rodent damage can stall escrow. In either case, waiting on a persistent infestation costs more than the inspection itself, both in property damage and in time lost chasing a problem DIY methods haven't touched.
Staying mouse-free for the long run
Getting rid of mice for good isn't about one perfect trap or one lucky sighting of an empty pantry. It's the combination of removing food and shelter, sealing every gap a pencil could fit through, trapping smart, and watching the results that actually breaks a colony's grip on your house. Skip any one of those steps and you're just buying a few quiet weeks before the scratching starts again.
Seasons change, homes settle, and new gaps open up even after you've done everything right. Long-term rodent control means checking your work every fall before the weather pushes mice indoors again, not waiting for the next dropping to show up behind the pantry. If you've worked through these steps and mice keep coming back, or you'd rather skip straight to a solution that lasts, get in touch with Defender Termite & Pest Management for an inspection that finds what your traps can't.