Integrated Pest Management for Bed Bugs: Step-By-Step
Bed bugs are persistent, elusive, and frustratingly resistant to single-method treatments. If you've tried spraying a product from the hardware store and hoped for the best, you already know that approach rarely works. Integrated pest management for bed bugs takes a different route, it combines inspection, monitoring, non-chemical tactics, and targeted treatments into a structured, multi-step strategy that actually gets results.
IPM isn't a buzzword. It's a proven framework used by pest control professionals to address infestations at every stage of the bed bug lifecycle. Instead of relying on chemicals alone, it layers multiple methods together so each one covers the gaps left by another. That's how you go from chasing a problem to solving it for good .
At Defender Termite & Pest Management, we've been helping Sacramento-area homeowners and businesses deal with tough pest problems since 1999. Bed bug calls are some of the most stressful situations we walk into, people are exhausted, frustrated, and often unsure where to start. This guide breaks down the IPM process step by step , so you understand exactly what effective bed bug elimination looks like and why each piece matters. Whether you're dealing with an active infestation or trying to prevent one, the information here reflects the same approach we use in the field every day.
What IPM for bed bugs means in real life
Most people think pest control means spraying something and waiting. With bed bugs, that mindset leads to months of repeated failed treatments and a problem that keeps compounding. Integrated pest management for bed bugs is a structured system that combines inspection, monitoring, physical removal, heat, and targeted chemical application into a coordinated plan. Each step feeds into the next, and nothing gets skipped just because it's inconvenient or time-consuming.
Relying on a single method against bed bugs rarely works because of one word: resistance . Bed bugs have developed documented resistance to many common insecticides over decades of overuse. Spray-only approaches may kill a portion of the population while leaving resistant survivors to reproduce unchecked . A layered strategy closes that gap by using methods that don't share the same failure points.
IPM is a system, not a single treatment
The word "integrated" is what separates this framework from a quick fix. An IPM plan pulls together multiple control methods that work simultaneously: physical barriers, environmental modifications, mechanical removal, and chemical treatments chosen based on the specific situation rather than applied as a default. You're not picking one tool; you're working through a full toolbox in a deliberate order.
When you treat bed bugs with only one method, you're betting that method covers every life stage, every hiding spot, and every resistance profile, and that bet rarely pays off.
Consider the bed bug lifecycle. A single female can produce 200 to 500 eggs in her lifetime, and those eggs are largely resistant to pesticide contact. A chemical-only treatment can wipe out adults while leaving a wave of hatching eggs ready to restart the infestation within two to three weeks. IPM accounts for this by using heat and steam to address eggs and all nymph stages , while targeted residual pesticides handle surfaces where adults travel and rest.
Why bed bugs demand this level of structure
Bed bugs are not like most household pests that move through open areas where a spray barrier can intercept them. They hide in mattress seams , electrical outlets, picture frames, furniture joints, and behind baseboards. Without a dedicated inspection phase to map out those hiding spots first, any treatment you apply is guesswork, and you'll keep retreating the same visible areas while the infestation rebuilds from spots you never found.
Structure also creates accountability at every stage of treatment . IPM includes monitoring through mattress encasements, interceptor cups placed under bed legs, and follow-up inspections scheduled at specific intervals after treatment. Without that monitoring layer, you have no reliable way to know if you've eliminated the infestation or just suppressed it temporarily. Tracking captures data, and data tells you when to escalate the approach, when to confirm success, and when a secondary treatment wave is needed before adults can resume laying eggs.
The practical reality is that bed bug IPM requires patience and consistency. A single treatment visit, no matter how thorough, rarely resolves a moderate or established infestation in one pass. You need a plan that accounts for multiple lifecycle stages , follow-up timelines, and ongoing monitoring until capture counts on your interceptors reach zero and stay there. That's what separates a controlled elimination from a recurring problem that costs you more time and money every month it drags on.
Step 1. Confirm bed bugs and find the hiding spots
Before you treat anything, you need to confirm exactly what you're dealing with and locate every hiding spot in the space. Misidentification is one of the most common reasons treatments fail. People treat for bed bugs and are actually dealing with bat bugs, spider beetles, or carpet beetles, wasting time and money on the wrong problem entirely. Visual confirmation using a flashlight and magnifying lens is the first non-negotiable task in integrated pest management for bed bugs, and skipping it means you're treating blind.
How to identify bed bugs and their signs
Adult bed bugs are flat, oval, and roughly the size of an apple seed , about 4 to 5 millimeters long. After feeding, they swell and turn darker reddish-brown. You won't always spot live bugs on the first pass, so look for the evidence they leave behind: rust-colored stains on mattress seams from dried blood or crushed bugs, pale shed skins from molting nymphs, and tiny cream-colored eggs tucked into fabric folds or wooden cracks. Finding even one of these signs means you have an active infestation.
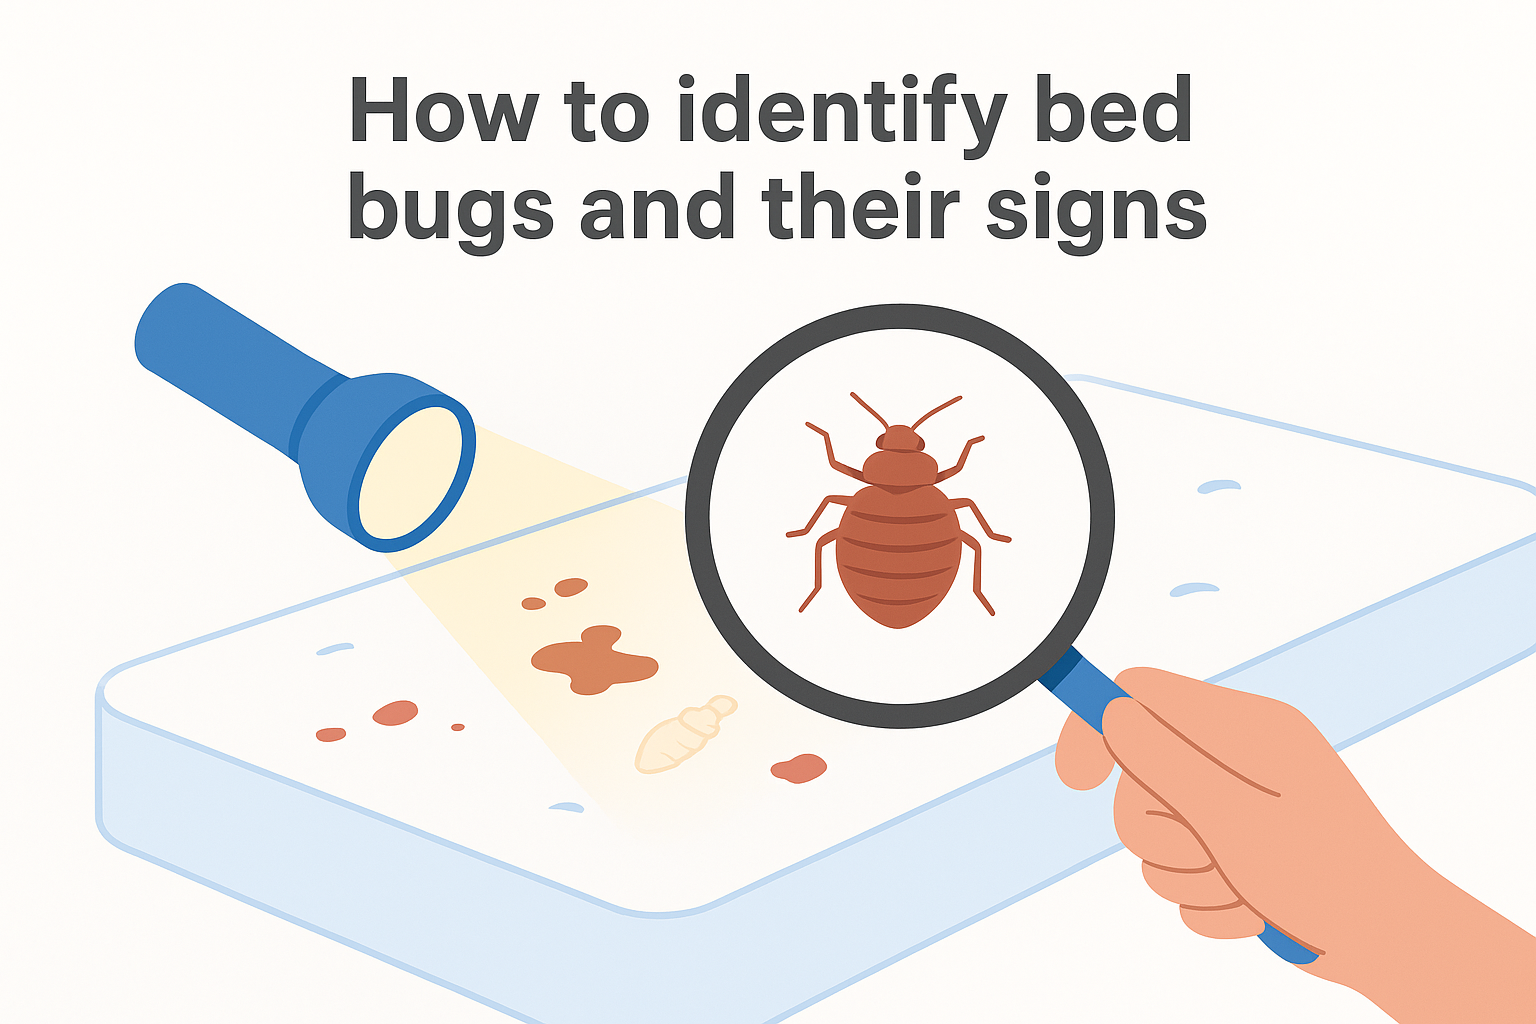
Use this checklist during your inspection:
- Rust or reddish-brown stains on sheets, mattress seams, or upholstery
- Dark fecal spots (roughly the size of a pen tip) on fabric, wood, or wallpaper edges
- Shed skins along mattress seams, box spring edges, or bed frame joints
- Live bugs hiding in tufts, folds, or cracks near sleeping areas
- A faint sweet or musty odor in rooms with severe infestations
Where to search and how to do it systematically
Start at the bed and move outward in expanding zones. Strip all bedding and inspect every mattress seam, tag, and corner with your flashlight. Pull the box spring dust cover and check every wooden slat and staple line underneath. Then examine the bed frame, headboard, and nightstands , pulling each piece of furniture away from the wall to check back panels and joints where bugs cluster out of sight.
The hiding spots you miss during inspection become the source of your next infestation wave, so give this step as much time as any treatment you apply.
From the bed, expand your search to upholstered chairs, outlet covers, picture frames, and baseboards within 10 to 15 feet of where people sleep. Sketch a simple floor plan and mark every location where you find signs, giving you a reference map to guide treatment and confirm results at every follow-up inspection.
Step 2. Prep the room and stop bed bug spread
Preparation is what separates a treatment that works from one that spreads the problem to new rooms. Moving infested items without proper containment is one of the most common ways people turn a single bedroom infestation into a whole-house problem. Before any heat, steam, or pesticide goes down, you need to seal off the affected area and prepare every surface so treatment can reach the bugs rather than push them further into walls and furniture.
Contain, don't spread
Start by placing interceptor cups under each bed leg before you move anything else. These small plastic traps catch bugs traveling up or down the bed frame and give you a baseline capture count you can track through the entire treatment process. Once interceptors are in place, handle infested items carefully. Bag clothing, bedding, and soft items directly into sealed plastic bags before carrying them out of the room, and move straight to the washer without setting bags down on other furniture along the way.
Moving items loosely through the house is the single fastest way to scatter an infestation from one room to several.
Wash all fabric items on the hottest water setting the fabric tolerates , then dry on high heat for at least 30 minutes. Bed bugs and their eggs die at sustained temperatures above 118°F (48°C), so heat in the dryer does the actual killing even when the wash cycle alone does not. Seal clean items in fresh bags until all treatments in the room are complete, so you're not reintroducing clean items into an active environment.
Reduce clutter and seal entry points
Clutter gives bed bugs more hiding spots and makes any treatment significantly less effective. Remove items stored under the bed, clear nightstands, and pull furniture at least six inches from walls so treatment products can reach baseboards without obstruction. Bag clutter items the same way you handled bedding, inspecting each piece before sealing.
Seal cracks in baseboards, outlet covers, and furniture joints using caulk before treatment begins. This step is a core part of integrated pest management for bed bugs because it forces bugs to travel across treated surfaces rather than retreating into untreated voids behind walls. Once the room is prepped and contained, install mattress and box spring encasements rated specifically for bed bugs so any bugs still inside the mattress cannot escape or feed. Keep those encasements on for a minimum of 12 months to ensure surviving eggs complete their lifecycle without access to a host.
Step 3. Kill bed bugs with heat, steam, and cleaning
Non-chemical treatments form the backbone of integrated pest management for bed bugs because they work regardless of pesticide resistance. Heat kills bed bugs and their eggs across all lifecycle stages without leaving any chemical residue on the surfaces where you sleep. This step is where you start eliminating the population you confirmed during inspection, using physical methods that reach places sprays simply cannot.
Use a dryer and portable heat chambers on infested items
Your clothes dryer is one of the most effective tools available for treating soft items like clothing, stuffed animals, pillows, and curtains . Place items directly from their sealed bags into the dryer and run on high heat for a minimum of 30 minutes. Sustained temperatures above 118°F (48°C) kill all lifecycle stages , including eggs that pesticide contact typically cannot penetrate.
For larger items that don't fit in a dryer, portable heat chambers designed for bed bug treatment are a practical option. Load the chamber and set the temperature to at least 120°F for a minimum of 60 minutes to ensure full heat penetration through denser items like luggage or books. Follow this reference when choosing your heat method:
| Item Type | Recommended Method | Minimum Duration |
|---|---|---|
| Clothing and bedding | Dryer on high heat | 30 minutes |
| Stuffed animals, pillows | Dryer on high heat | 30 minutes |
| Books, shoes, small bags | Portable heat chamber | 60 minutes |
| Luggage | Portable heat chamber | 60 minutes |
Apply steam to mattresses, furniture, and baseboards
A steam cleaner producing dry steam at 200°F or higher delivers lethal heat directly into mattress seams, furniture joints, and baseboards where bed bugs cluster. Move the steam nozzle slowly across each surface , about one inch per second, so heat penetrates the material rather than just passing over the top layer.
Steam only works when the nozzle moves slowly enough to raise the surface temperature above the lethal threshold, speed defeats the purpose entirely.
Work through each hiding spot you mapped during your inspection, including mattress seams, box spring edges, and baseboard gaps . Avoid saturating fabric surfaces, since excess moisture can cause mold growth in addition to the bed bug problem you're already managing.
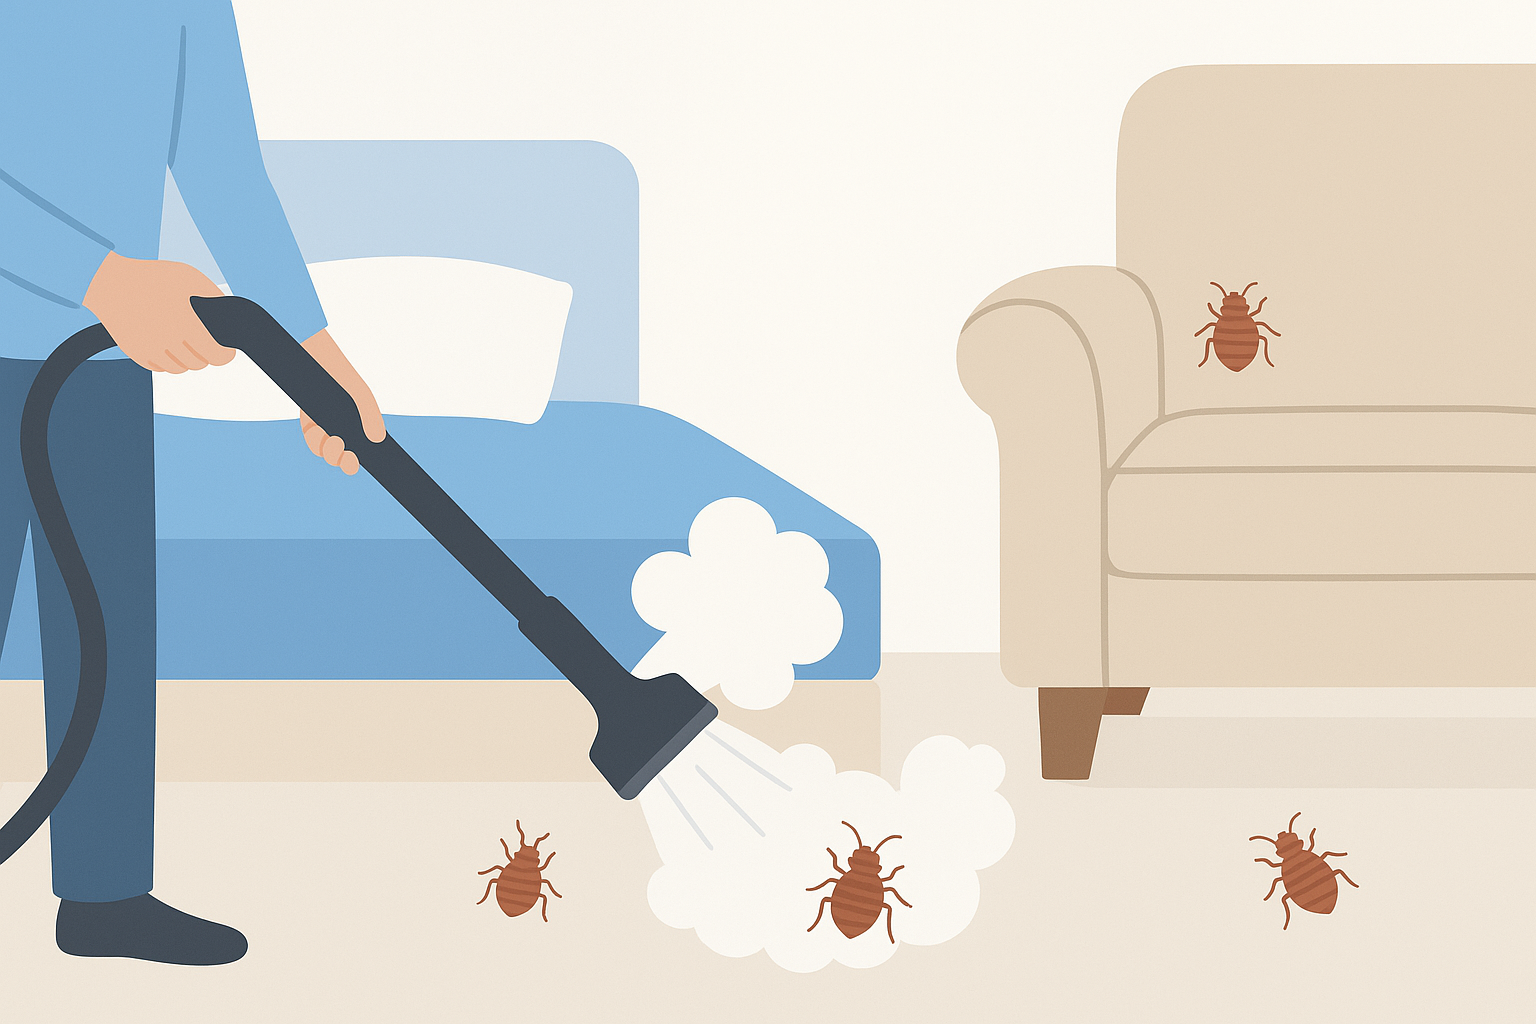
Vacuum every treated surface before moving on
Vacuum all surfaces you've steamed immediately after steam treatment while bugs are exposed and heat-stressed. Use a crevice attachment along mattress seams, baseboards, and furniture joints , then seal the vacuum bag in a plastic bag before disposing of it outside your home. Removing live bugs, shed skins, and eggs at this stage reduces the population load before you apply chemical treatments in the next step.
Step 4. Use pesticides safely as a last layer
Pesticides work best as a targeted final layer , not a starting point. After you've removed the bulk of the population through heat, steam, and vacuuming in Step 3, residual chemical treatments can intercept survivors and any newly hatched nymphs moving across treated surfaces. This is the core logic behind integrated pest management for bed bugs: physical methods do the heavy lifting, and pesticides fill in the remaining gaps with precision.
Apply pesticides only after completing the non-chemical steps, because treating a cluttered, un-prepped room with chemicals simply pushes bugs into untreated voids where products can't reach.
Choose the right pesticide formulation
Not every pesticide label that mentions bed bugs works the same way. Residual liquid sprays containing pyrethroid compounds such as cypermethrin or deltamethrin create a contact-killing surface that remains active for weeks, but bed bug populations in many regions have developed resistance to pyrethroids. Pairing a pyrethroid with a neonicotinoid like imidacloprid or a different chemical class like chlorfenapyr increases the likelihood of killing resistant populations. Read labels carefully and confirm that bed bugs are listed as a target pest before purchasing any product.
For cracks, baseboards, and outlet voids, insecticidal dust formulations such as silica aerogel or diatomaceous earth work mechanically rather than chemically. They damage the bed bug's exoskeleton and cause dehydration, so resistance is not a factor. Apply dust in a thin, barely visible layer , because bed bugs can detect heavy dust deposits and walk around them entirely.
Apply products to the right surfaces
Target your applications to the specific zones you mapped during inspection : bed frame joints, baseboard edges, and furniture legs near sleeping areas. Never spray entire mattress surfaces or areas where unavoidable skin contact occurs. Use a crack-and-crevice applicator tip to place liquid spray exactly where bugs travel rather than broadcasting it across open surfaces.
Follow this application guide for the two main chemical types:
| Product Type | Target Locations | Key Precaution |
|---|---|---|
| Residual liquid spray | Baseboards, bed frame joints, furniture edges | Keep people and pets out until fully dry |
| Insecticidal dust | Outlet voids, baseboard cracks, wall gaps | Apply in thin layers only |
Allow treated rooms to ventilate fully before re-entry , following the specific re-entry interval printed on the product label.
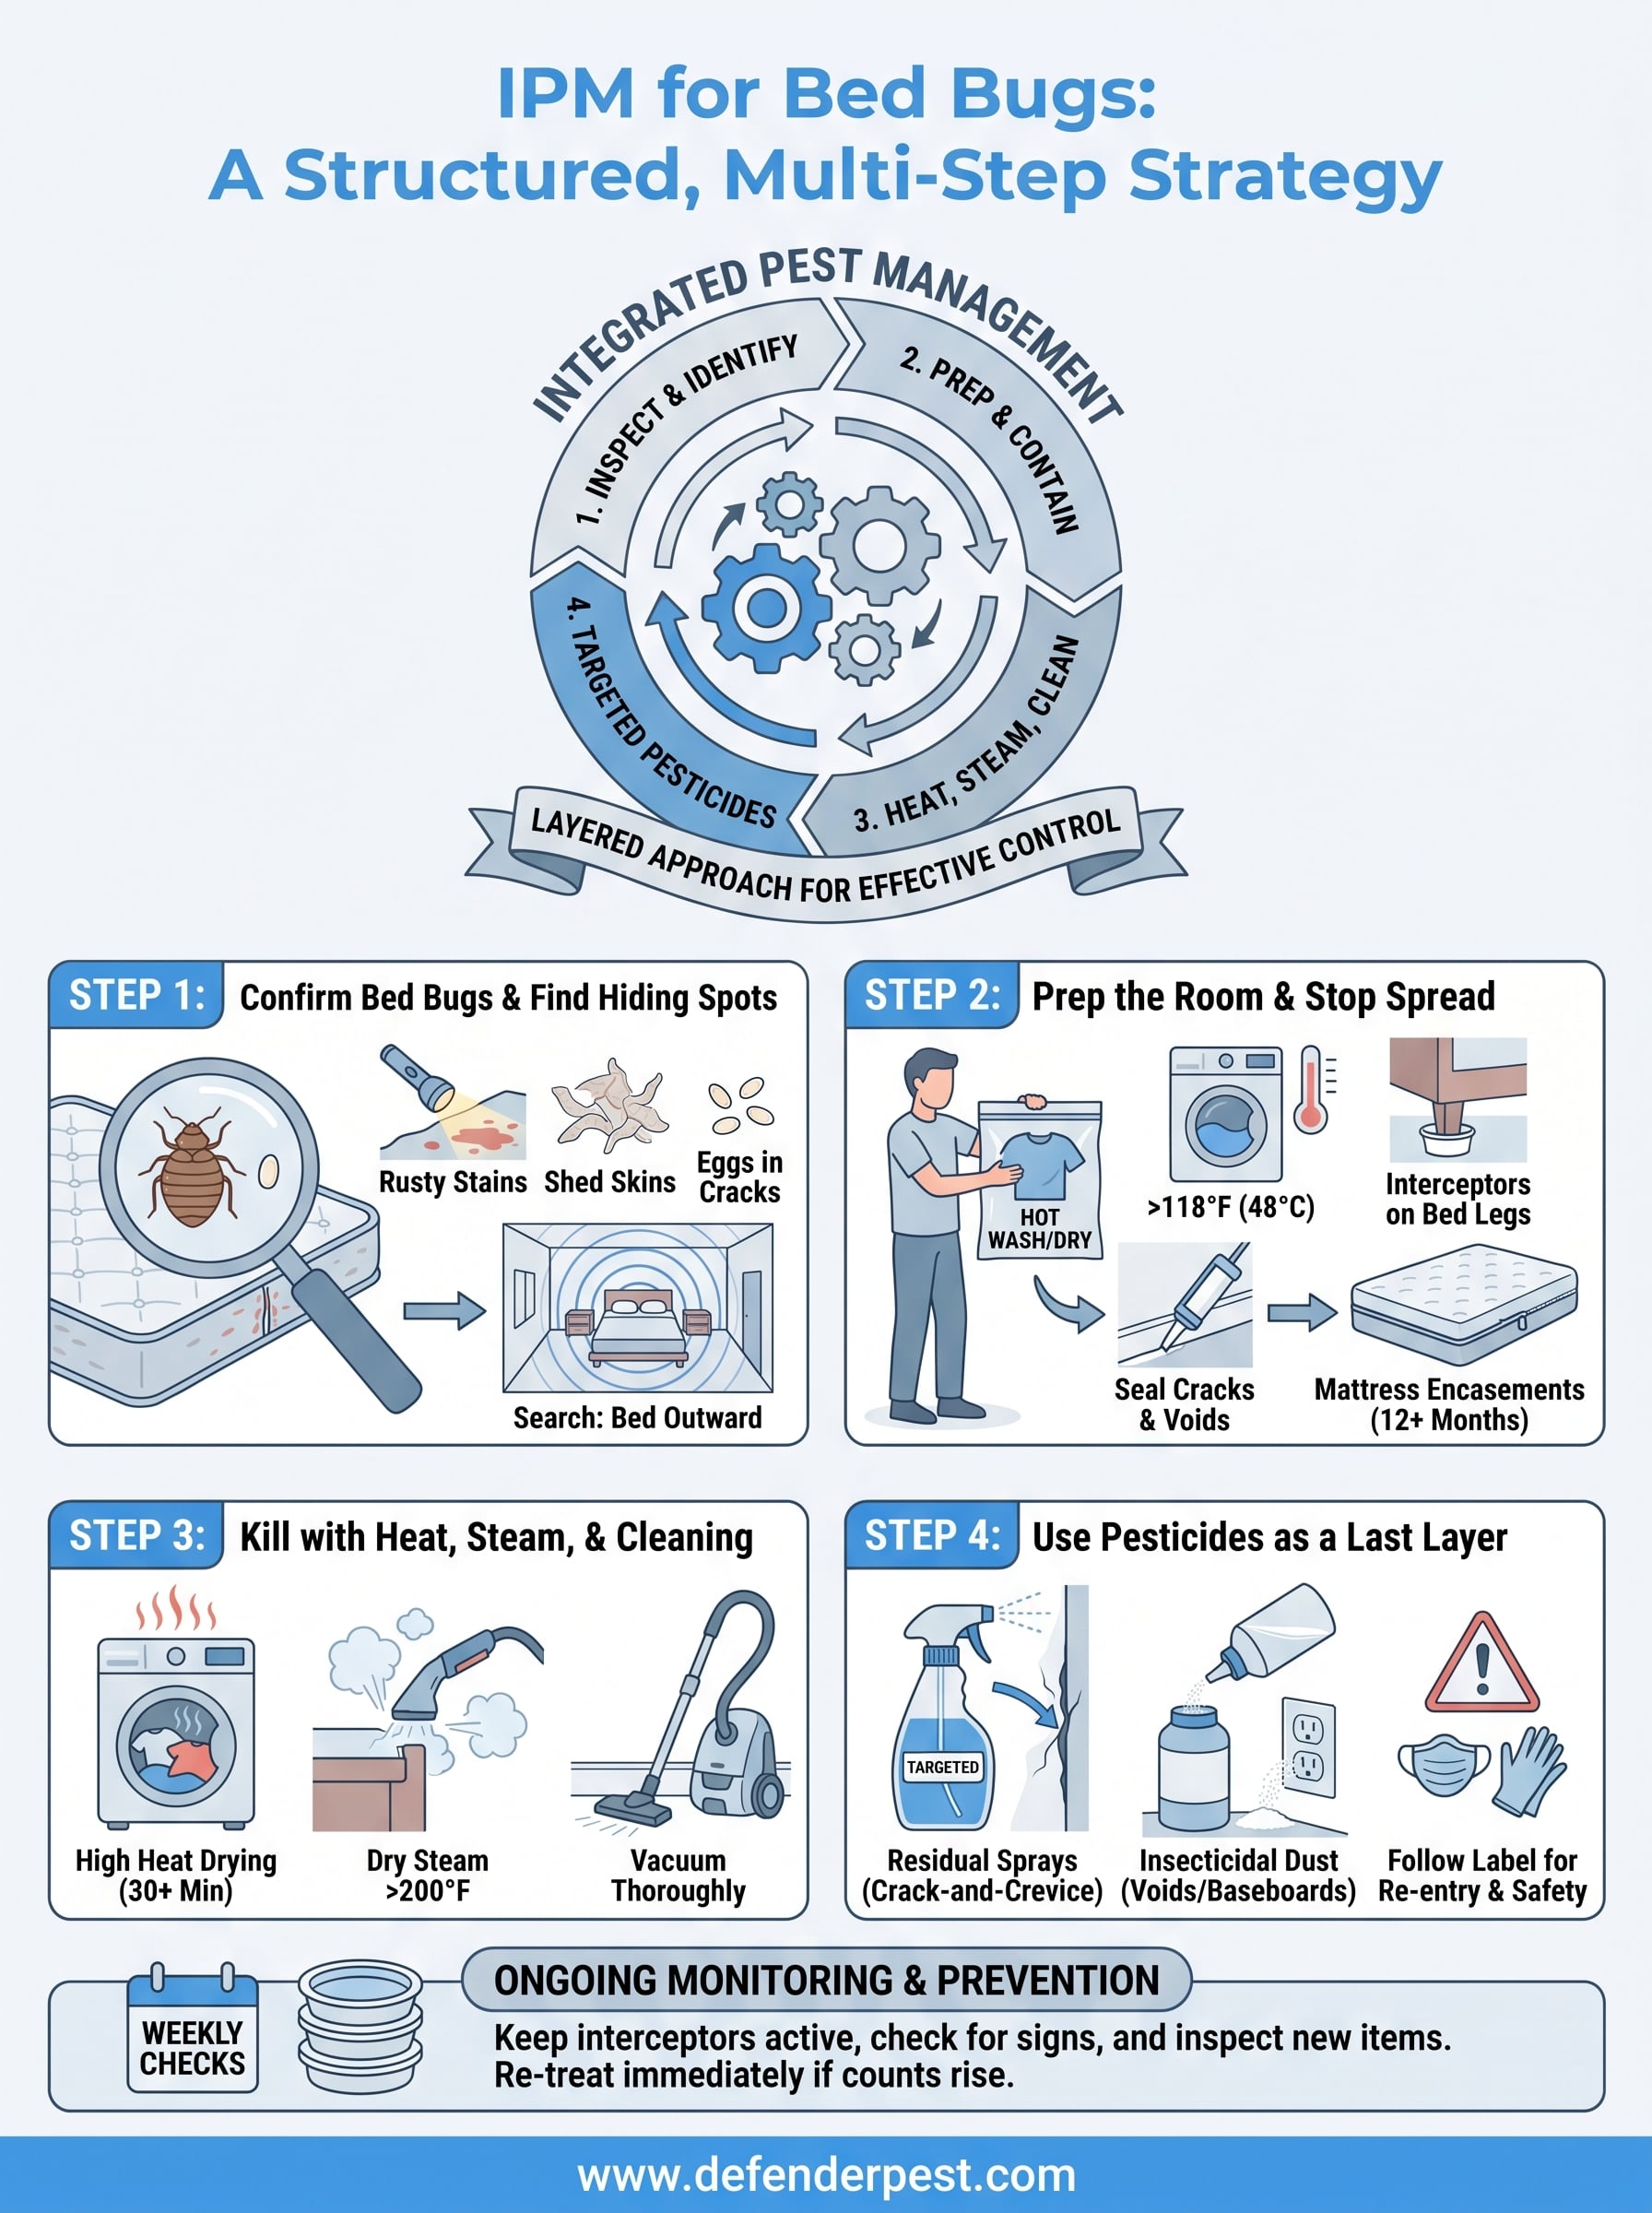
Keep bed bugs from coming back
Eliminating an active infestation is only half the job. Ongoing monitoring is what keeps your home clear after treatment ends. Keep interceptor cups under every bed leg and check them weekly for at least three months after your final treatment. Leave mattress and box spring encasements in place for a full 12 months. Inspect secondhand furniture before bringing it inside, and check luggage and clothing after any travel, since hotels are one of the most common sources of new introductions.
Integrated pest management for bed bugs works because it builds a system you can maintain, not just a one-time fix. If your interceptor counts rise again or you spot fresh signs during a follow-up check, act immediately before the population rebuilds. For professional help with inspections, treatment planning, or a tough infestation that isn't responding to your efforts, contact the team at Defender Termite & Pest Management.