Ants In Pots: How To Get Rid Of Ants In Potted Plants Fast
You walk over to water your favorite potted plant and notice a trail of tiny ants streaming in and out of the soil. Maybe they've built a full colony in there, and now the dirt is riddled with tunnels. If you're trying to figure out how to get rid of ants in potted plants , you're not alone, it's one of the most common pest problems we hear about from homeowners across the Sacramento area.
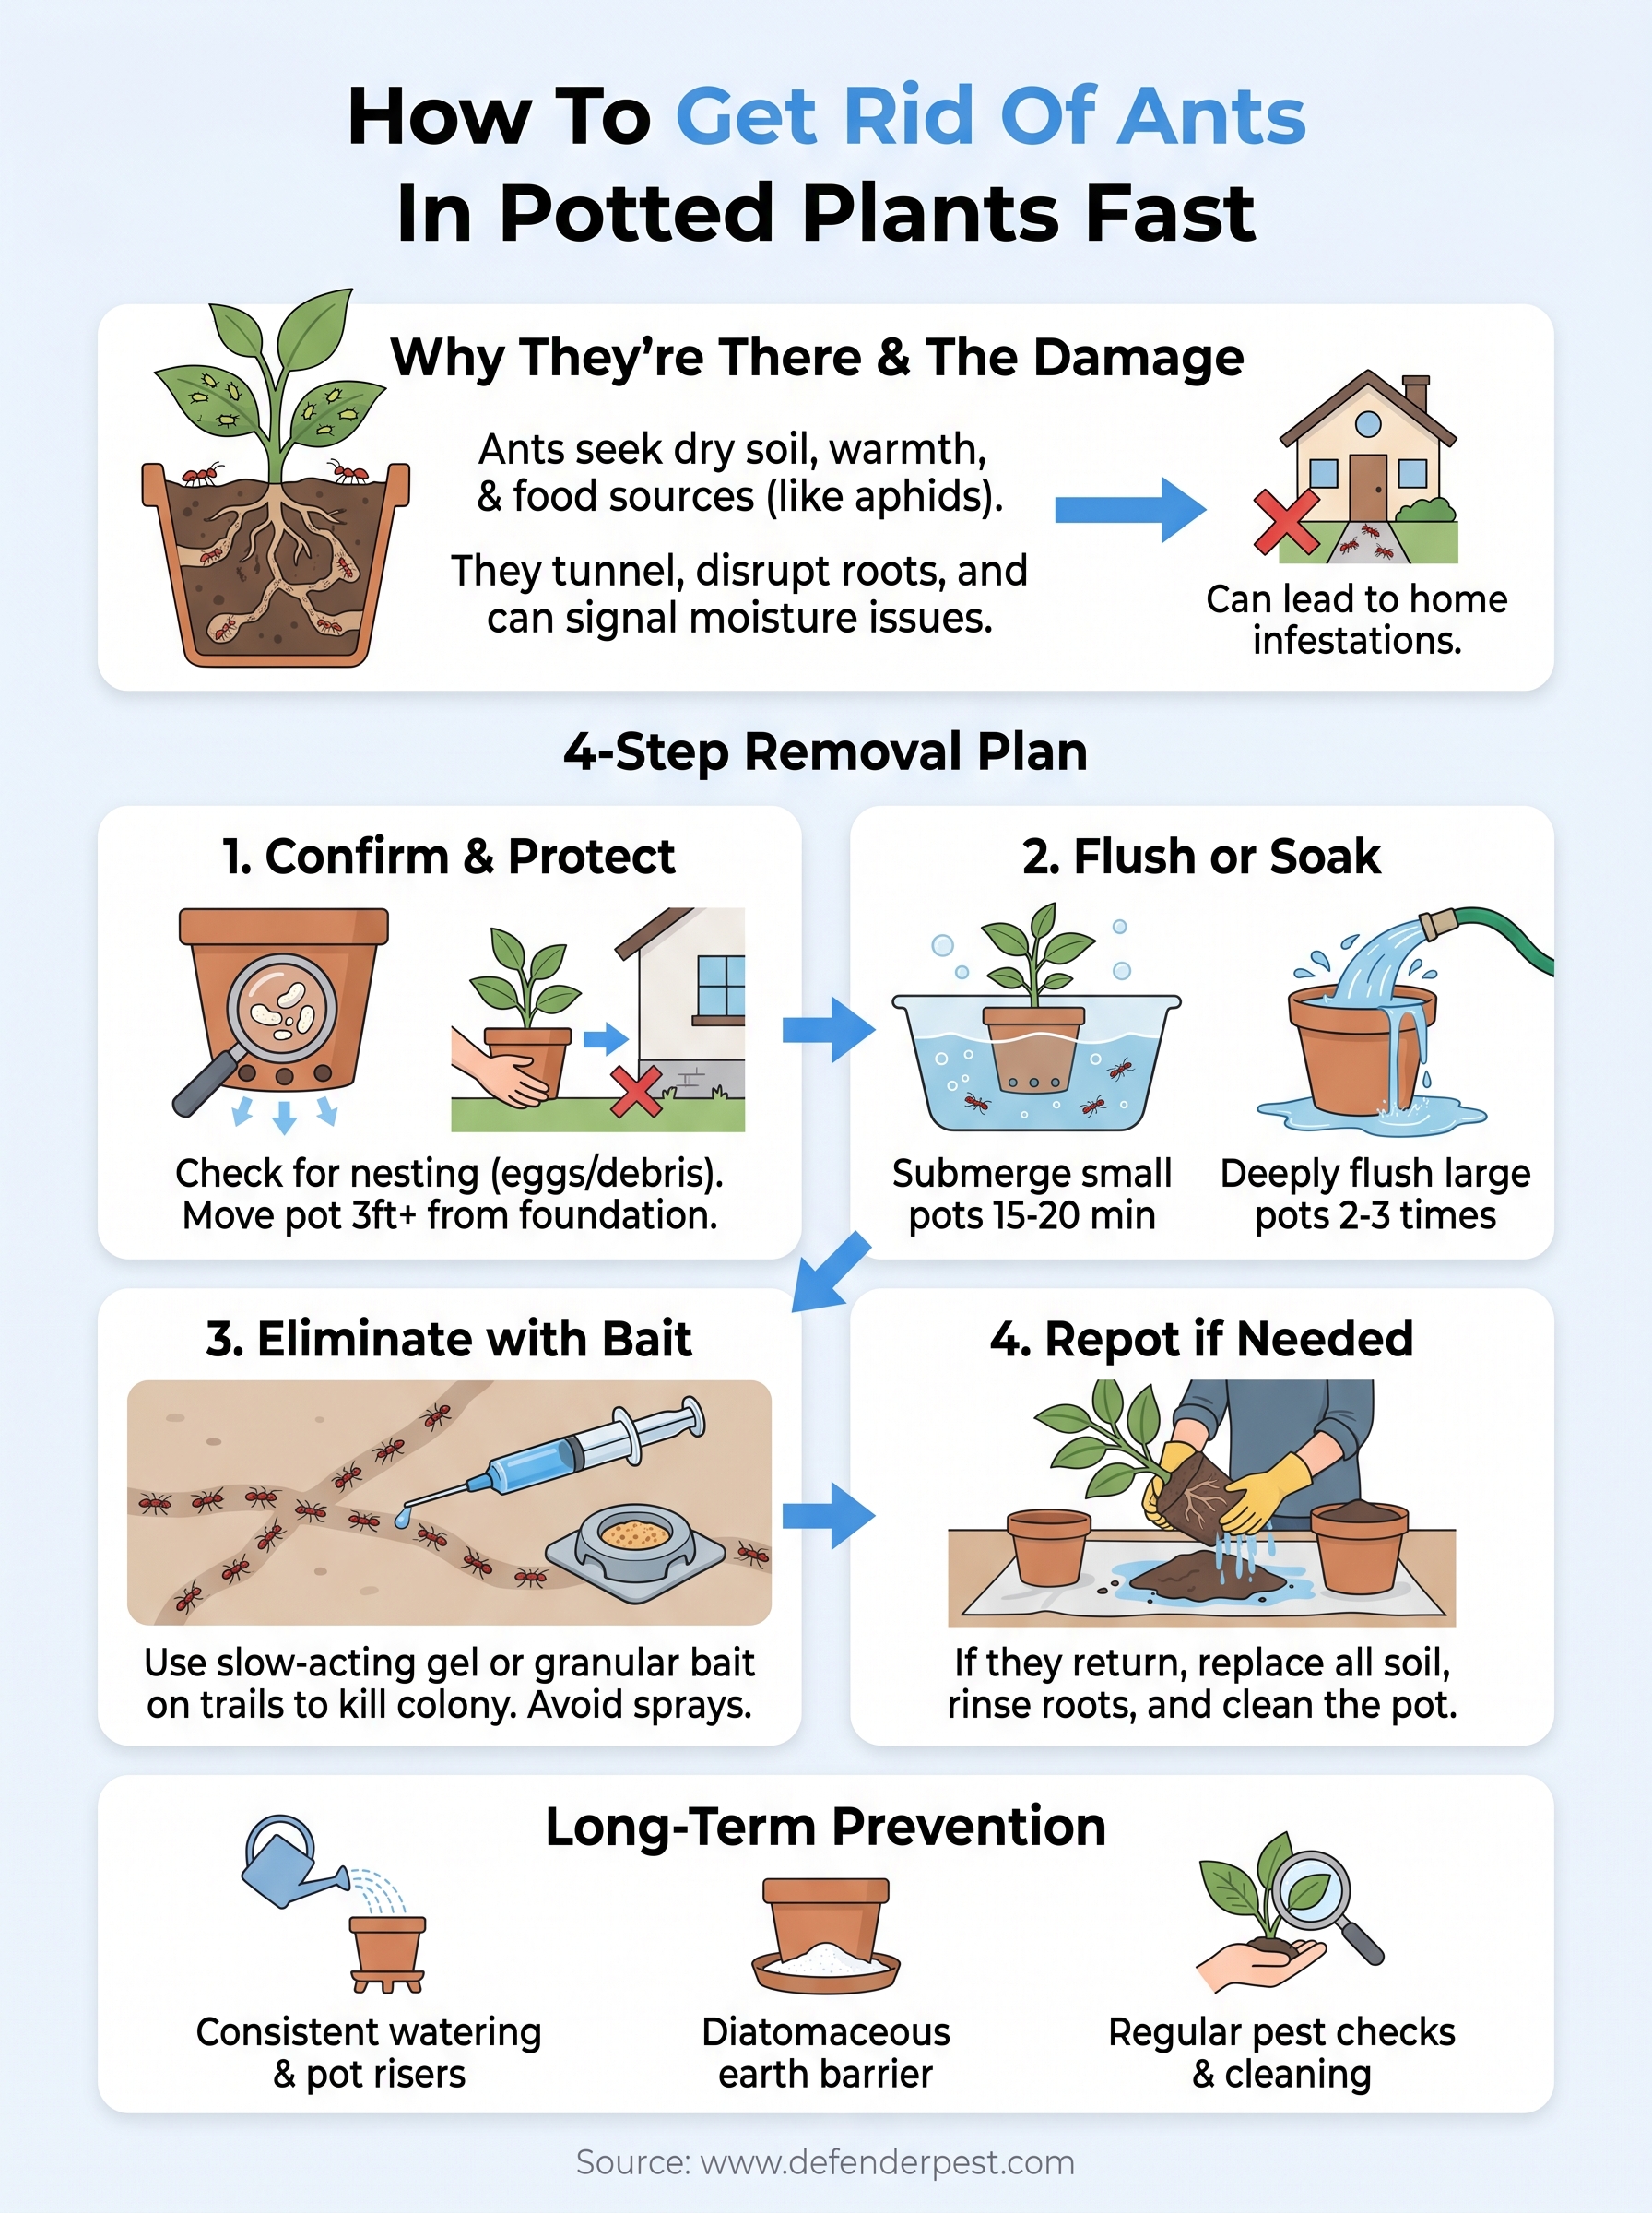
Ants in pots aren't just annoying. They can disturb root systems , farm aphids on your plants, and signal moisture or decay issues you might not have noticed yet. The good news is that most potted plant ant problems can be solved quickly with the right approach, without harming your plants in the process.
At Defender Termite & Pest Management, we've been helping Sacramento-area homeowners handle pest problems since 1999, from termite damage to ant infestations that won't quit . While many potted plant situations are DIY-friendly, knowing when to call a professional matters too. This guide walks you through proven methods to eliminate ants from your potted plants fast, covers both natural and chemical options, and helps you decide if it's time to bring in backup.
Why ants end up in potted plants
Ants don't choose potted plants randomly. They're looking for specific conditions , and pots often deliver exactly what they need: loose, workable soil that's easy to tunnel through and a protected environment that holds warmth and stays relatively undisturbed. Once scouts locate a suitable spot, they leave a pheromone trail back to the colony, and more ants follow quickly.
What makes potted soil so attractive
Ants are opportunists. Dry, loose potting mix is far easier to excavate than compacted garden soil, so pots become a top target when ants want to establish a satellite colony or a full nest. Pots also tend to stay warmer than the ground , especially clay or plastic containers sitting on a sunny patio or porch, and that warmth speeds up egg development considerably.
Several specific factors draw ants to potted plants more than bare garden beds:
- Dry soil : Underwatered pots create the loose, airy conditions ants prefer for tunneling and nesting
- Nearby food sources : Honeydew from aphids, fungus gnats, or decaying organic matter signals a food-rich spot worth claiming
- Built-in shelter : The pot's walls and drainage holes provide protected entry and exit points away from predators
- Proximity to structures : Pots near your foundation, windowsills, or doorways act as a bridge between outdoor colonies and your home's interior
If you spot ants in a potted plant near your front door or a ground-floor window, treat it as an early warning that they may already be testing entry points into your house.
What ants actually do to your plants
Understanding the damage helps you act faster and with more urgency. Ant colonies tunnel through root zones , which loosens the soil around roots and disrupts water and nutrient absorption. Plants in heavily infested pots often show wilting or yellowing even when you water them on schedule, because roots can't pull moisture from soil that's been broken into gaps and air pockets.
Ants also farm aphids and other soft-bodied insects directly on your plants. They protect these pests from natural predators and relocate them to fresh growth in exchange for the sticky honeydew the insects produce. This relationship can turn a minor aphid problem into a serious infestation within a few weeks. Recognizing these root causes is the foundation of learning how to get rid of ants in potted plants before the situation moves indoors or spreads to other containers.
Step 1. Confirm the source and protect your home
Before you treat anything, you need to know what you're actually dealing with . Ants in a pot may be nesting inside the soil or simply foraging through it on the way to something else. Those two situations require different approaches , and misreading the source wastes both time and product.
Check whether ants are nesting in the pot or just passing through
Lift the pot and examine the drainage holes at the base. Active nesting typically leaves visible soil debris packed around those openings, and worker ants will often carry eggs or larvae out when the pot is disturbed. If you see ants moving in a steady trail but find no activity in the soil itself, they're likely foraging rather than nesting , which means the colony is nearby rather than inside the container.
If you find eggs or larvae when you probe the top inch of soil with a stick, the colony is established and treating it quickly limits further root damage.
Seal the route before ants reach your home
Once you confirm ant activity, scan the area around the pot for trails heading toward your foundation, window frames, or doorways . Any container sitting within a few feet of your home creates a direct path indoors, and blocking that route matters just as much as learning how to get rid of ants in potted plants.
Check these specific spots for trails before moving the pot:
- Foundation cracks or gaps near the soil line
- Gaps around window or door frames
- Exterior pipe or utility line openings
Move the pot at least three feet from your exterior walls while you work through treatment, so that disturbed ants don't redirect toward your home's interior instead.
Step 2. Flush or soak the pot to force ants out
Water is your first and most immediate tool. Submerging or heavily flushing a pot drives ants out of the soil fast because they can't survive being flooded, and they'll evacuate within minutes, carrying eggs and larvae with them. This method works well as both a standalone treatment for light infestations and as a first step before applying bait or repellents.
The submersion method
Fill a bucket or basin large enough to hold the pot completely. Submerge the entire pot in water so the soil line sits about an inch below the surface, then hold it there for 15 to 20 minutes. Ants will surface quickly, so have a bowl of soapy water nearby to drop them into as they emerge. This is one of the most plant-safe approaches to how to get rid of ants in potted plants because it uses no chemicals at all.
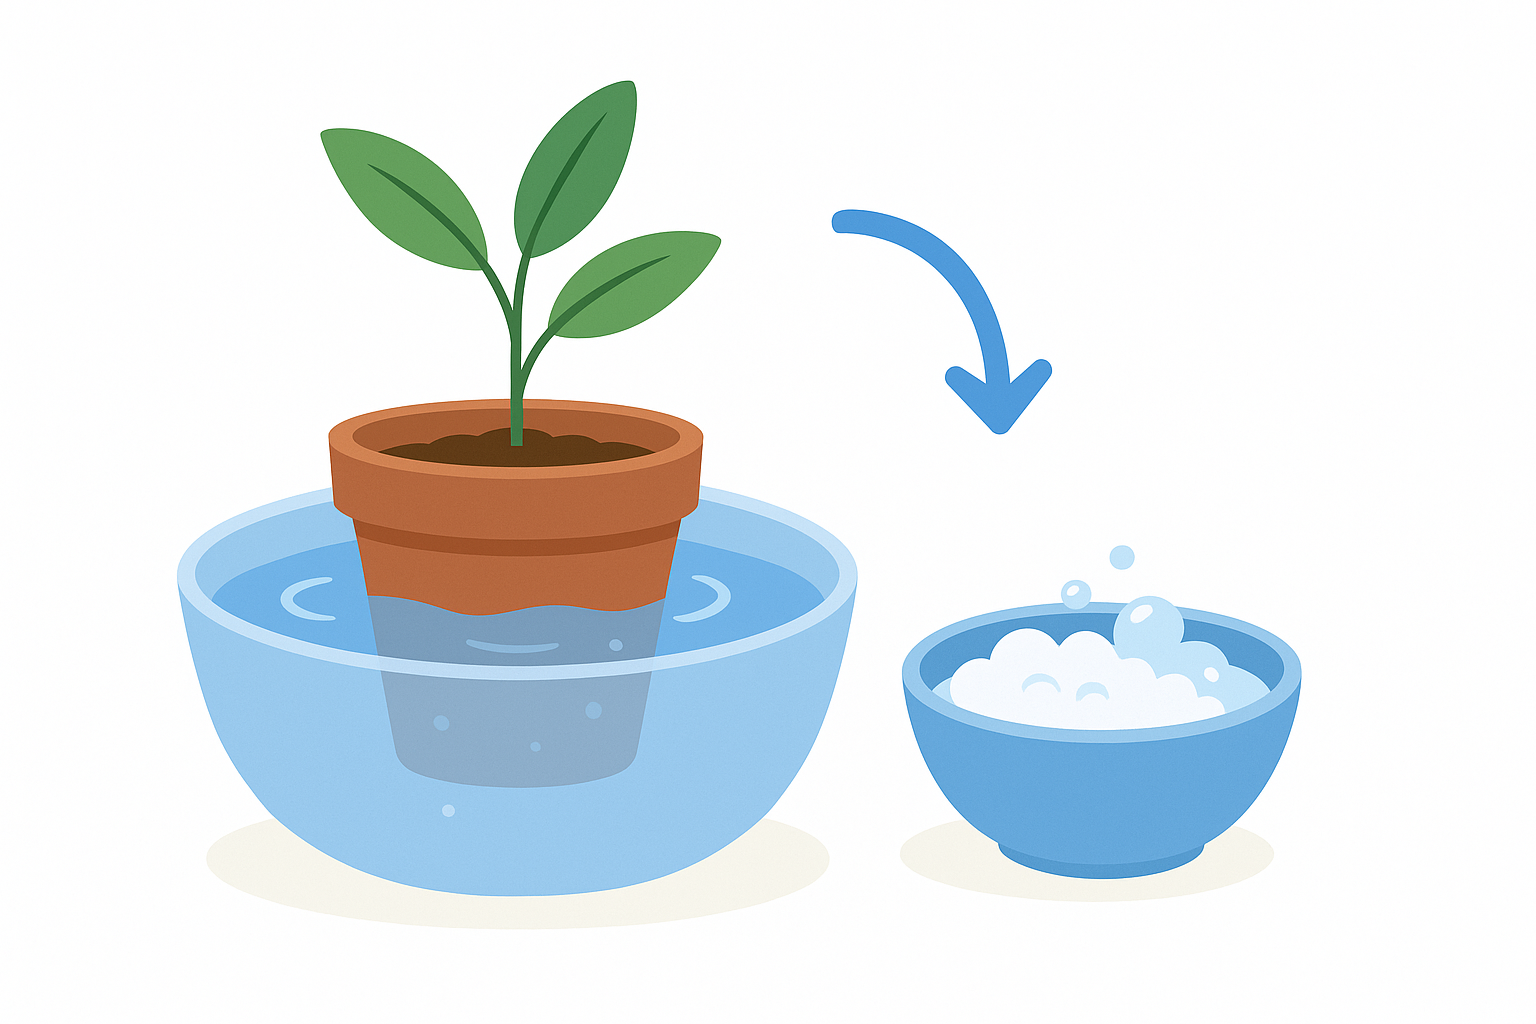
This method works best for smaller pots you can physically lift and submerge without risking root damage from rough handling.
The deep flush method for larger pots
For pots that are too large or heavy to submerge, slow and deep flushing achieves a similar result. Set the pot in a location where water can drain freely, then water it slowly and thoroughly for several minutes, soaking the soil completely from top to bottom. Repeat this process two or three times over 30 minutes to collapse tunnels and drive the colony to the surface.
Apply these steps to make the flush as effective as possible:
- Water from the top slowly rather than dumping to avoid washing out soil
- Let each round drain fully before the next pour
- Scatter emerging ants using soapy water applied directly to the soil surface
Step 3. Eliminate the colony with targeted ant bait
Flushing removes ants from the soil but rarely wipes out the entire colony. To fully eliminate the problem , you need to kill the queen and the workers she supports. Targeted ant bait is the most effective tool for that job because worker ants carry the slow-acting poison back to the nest themselves, reaching parts of the colony that sprays and water never touch.
Choose the right bait type
Not all ant baits work the same way, and matching the formula to the situation improves your results significantly. Gel baits work well in tight spots near the pot's rim or drainage holes. Granular baits spread more easily across soil surfaces and hold up better in outdoor conditions where moisture is a factor.
Avoid contact sprays around the bait placement area. Sprays kill foraging workers before they can carry the bait back, which breaks the process that makes bait effective in the first place.
Here's a quick comparison to help you pick the right format:
| Bait Type | Best For | Placement Tip |
|---|---|---|
| Gel bait | Indoor pots, small colonies | Apply near trails and drainage holes |
| Granular bait | Outdoor pots, larger infestations | Scatter lightly on surrounding soil |
| Liquid bait station | Persistent infestations | Set beside the pot, not in the soil |
Place bait where it actually reaches the colony
Position the bait along active trails rather than in random spots. Watch where ants travel for 10 minutes before you place anything. Setting bait directly on or beside the trail dramatically increases pickup speed. Check placements every 24 to 48 hours and refresh them if the bait dries out or disappears quickly, which signals that the colony is actively feeding. Knowing how to get rid of ants in potted plants comes down to patience at this stage, since full colony elimination typically takes three to seven days.
Step 4. Repot and reset when ants keep returning
If ants return to the same pot within a week or two after flushing and baiting, the colony is likely deeper or larger than surface treatments can reach. Repotting is the most reliable reset, because it removes infested soil entirely and eliminates hidden egg chambers or satellite tunnels that repeated treatments can't access.
How to repot without spreading ants
Start by moving the pot away from your home and other containers before you open it up. Lay down a tarp so loose soil doesn't scatter ants across your patio. Tap the pot firmly on its sides, then slide the root ball out in one motion. Shake the roots gently and brush off as much old soil as possible before transferring the plant into its new container.
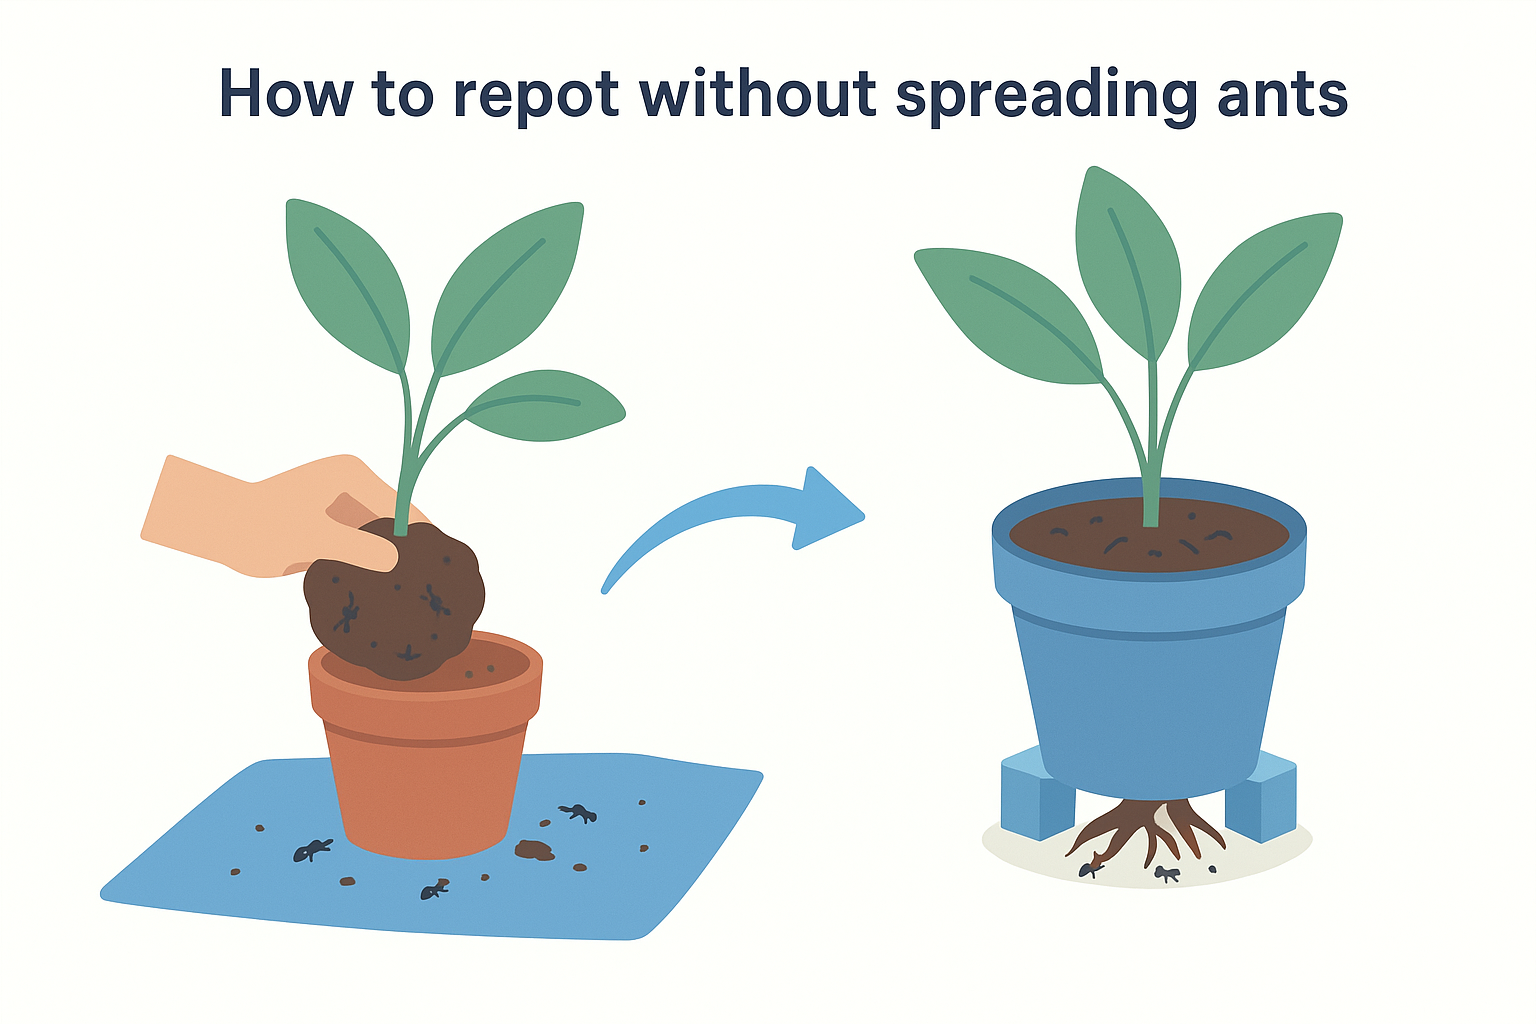
- Discard all infested soil in a sealed bag rather than a compost pile
- Wash the pot with hot soapy water before refilling it
- Let the pot air dry completely before adding fresh mix
Rinse the root ball under running water to remove any remaining ants, eggs, or larvae before replanting.
Set up the new pot to resist reinfestation
Fresh, high-quality potting mix is the right starting point. Add a thin layer of diatomaceous earth to the bottom of the pot before filling it, which creates a physical barrier that discourages ants from re-entering through drainage holes.
Place the repotted plant on pot feet or small risers to lift the drainage holes off the ground. This adjustment cuts off one of the most common ant entry points and ties directly into learning how to get rid of ants in potted plants for good.
A simple plan to keep ants out
Most ant problems in potted plants follow a predictable pattern: dry soil, nearby food sources, and a sheltered spot close to your home . Cutting off those three conditions keeps ants from treating your containers as prime real estate. Water your pots consistently so the soil never dries out completely, inspect leaves regularly for aphids, and keep containers at least three feet from your foundation .
Knowing how to get rid of ants in potted plants is only half the job. Prevention is what stops you from repeating the same treatments every few weeks. Sprinkle diatomaceous earth around the base of your pots each spring, use pot risers to block drainage-hole entry, and replace old potting mix once a year to remove hidden eggs and tunnels before they develop into a full colony.
If ants keep coming back despite your best efforts, the colony may be larger than surface-level fixes can handle . The team at Defender Termite & Pest Management can identify the source and eliminate it for good.